Writing a Boot Sector
We have a freestanding Rust binary designed for the x86 architecture, but it's still not quite ready yet for an x86 machine on start-up.
Creating a Raw Binary File
An x86 machine on start-up expects a raw binary file as a bootloader. Let's see the format of our current executable...
/🐧 On Mac/Linux: The
filecommand allows us to see the format of any specified file.⊞ On Windows: The
filecommand on Windows is accessible inside the MSYS2 Shell which can be installed through https://www.msys2.org/. This shell will be needed for installing future command line tools as well.

The Rust compiler generated a file in the ELF format, which is essentially a binary file with a bunch of associated metadata. An x86 machine on start-up is not expecting any of this metadata when it runs our program, so our task is now to strip it from our generated file.
Thankfully, there is a command line tool called objcopy that precisely strips metadata from ELF files.
🐧 On Linux:
objcopyis installed on Linux machines by default. On Mac: Running
brew install x86_64-elf-binutilsallows you to use thex86_64-elf-objcopytool, which is the same as Window's and Linux'sobjcopy.⊞ On Windows:
If you haven't already, install the MSYS2 Shell through https://www.msys2.org/.
Running
pacman -S mingw-w64-x86_64-binutilswithin the MSYS2 Shell installsobjcopyon your machine.❗ IMPORTANT:
objcopywill be usable within Window's default Command Prompt, not the MSYS2 shell.If you still cannot run
objcopy, make sure thatC:\mysys64\mingw64\bin(MSYS2 Shell's binaries directory) is part of your system'sPathenvironment variable.
- Navigate to your system's environment variables under
Control Panel.- Under
System variables, addC:\mysys64\mingw64\binto thePathvariable. Restart your shell andobjcopyshould be usable now.You can verify installation by running
objcopy --versionon Linux and Windows orx86_64-elf-objcopyon the Mac.
The objcopy command has the following format:
objcopy -I <input-format> -O <output-format> <input-file> <output-location>
Let's go through each of these fields:
- The specific
<input-format>of the generated file iself32-i386, and we can see this matches with what command-line tools say the format of the file is:

- We want the
<output-format>to be a rawbinaryfile. - The
<input-file>we want to convert is thestage_1compiled file. - I'll call the
<output-location>asstage_1.bin, emphasizing that this file is a raw binary file.
The final command to run (within the directory with your compiled stage_1 file) is:
objcopy -I elf32-i386 -O binary stage_1 stage_1.bin
🚨 REMINDER: If you are on a Mac , remember to write
x86_64-elf-objcopyinstead of justobjcopy.
We finally have a file, stage_1.bin, in the format that an x86 machine on start-up would like. Let's run it.
The QEMU Emulator
Testing your bootloader and your operating system on an actual computer is difficult as every time any change is made, you need to burn your project onto a USB stick and reboot your machine. If you develop with only one machine, constantly switching and rebooting between the operating system your making and the operating system you're developing on will really slow down any progress you're making.
Instead, we are going to use an emulator, which emulates the hardware of a regular computer. This allows you to develop and test on one machine without needing constant reboots.
QEMU is definitely the most popular emulator used for OS development. You can find installation instructions at https://www.qemu.org/download/.
Installing QEMU should allow you to use the qemu-system-x86_64 command, which emulates an x86 machine. Run qemu-system-x86_64 --version on your terminal to verify that it's there. This is nice because after we are done with setup, it won't matter which architecture your machine uses as we will all be developing for x86 through the QEMU's x86 emulator.
We can run our generated stage_1.bin file on QEMU with the command...
qemu-system-x86_64 -drive format=raw,file=stage_1.bin
After a few seconds, QEMU will complain that there is No bootable device.
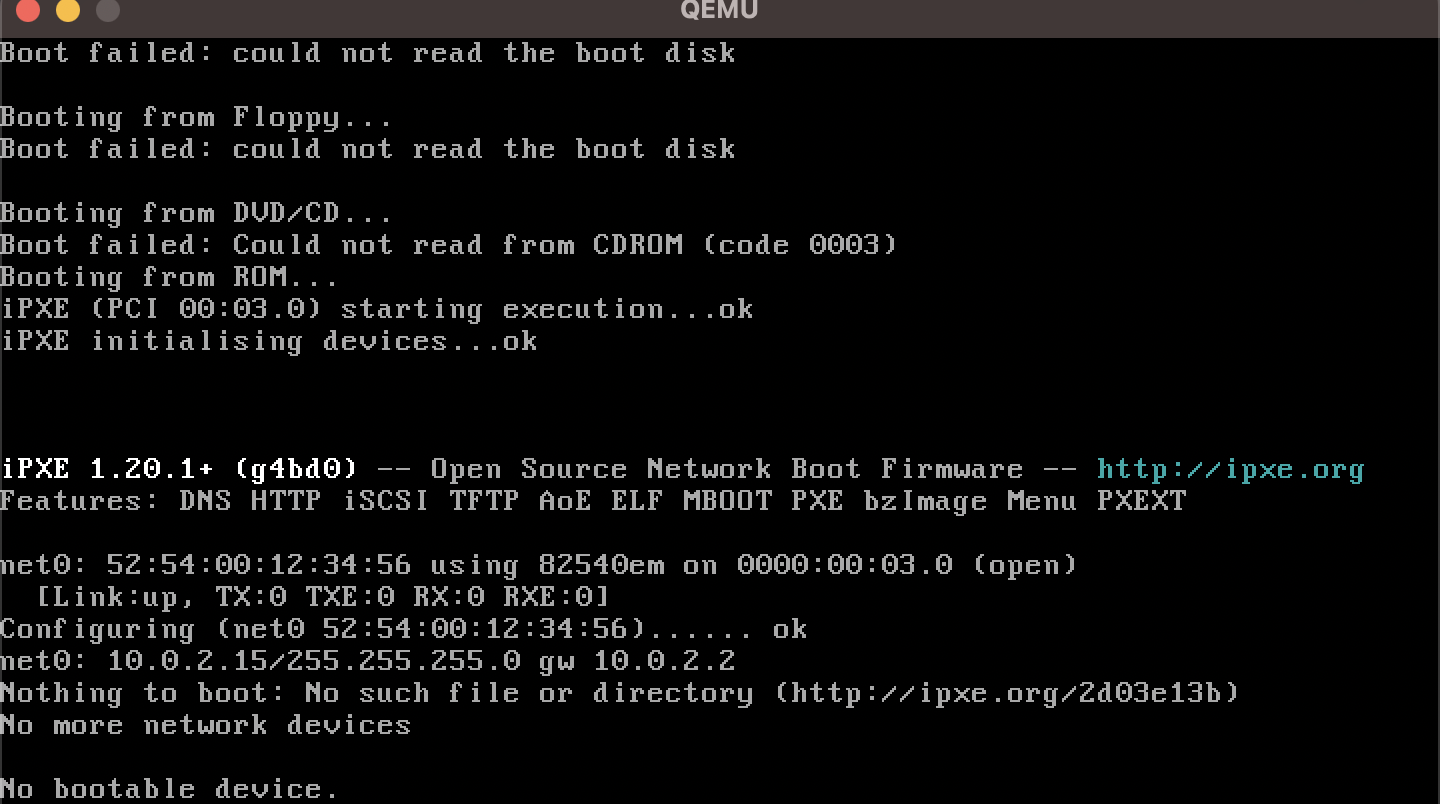
QEMU isn't recognizing our binary file as valid bootable code. Let's revisit exactly how QEMU and other x86 machines on start-up handle the booting process.
What Went Wrong? Revisiting the Booting Process
The command tells QEMU to treat our binary file stage_1.bin as its emulated hard disk, which is a type of secondary storage.
A Quick Computer Architecture Tour
A computer's central processing unit (CPU) is the hardware computer that is responsible for running computer instructions.
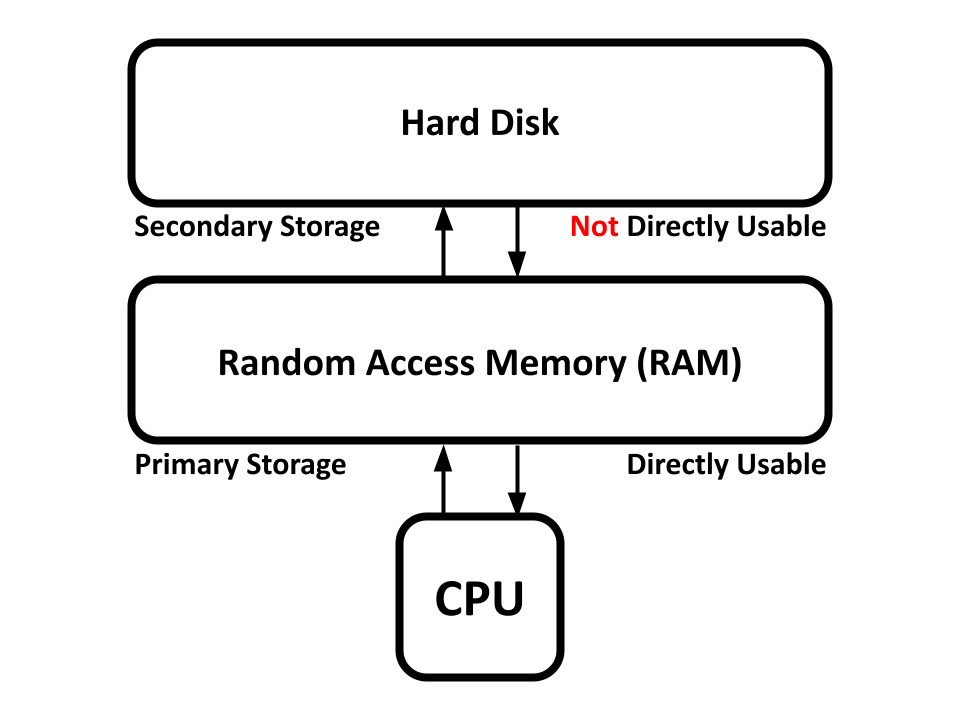
However, running instructions isn't useful if you don't have memory to work with. Random Access Memory (RAM) is a form of primary memory storage that a CPU can directly work with.
Secondary memory storages (like the hard disk) are usually significantly larger than primary storage, but cannot directly be used by the CPU. Memory from secondary storage must first be copied over to primary storage before the CPU can work on it.
A computer's primary storage is generally wiped and reset every time a computer is powered on. Memory in secondary storage, on the other hand, persists throughout computer start-ups. This is why bootloaders and kernels are kept in secondary storage, so they don't get wiped and deleted in primary storage on a power off.
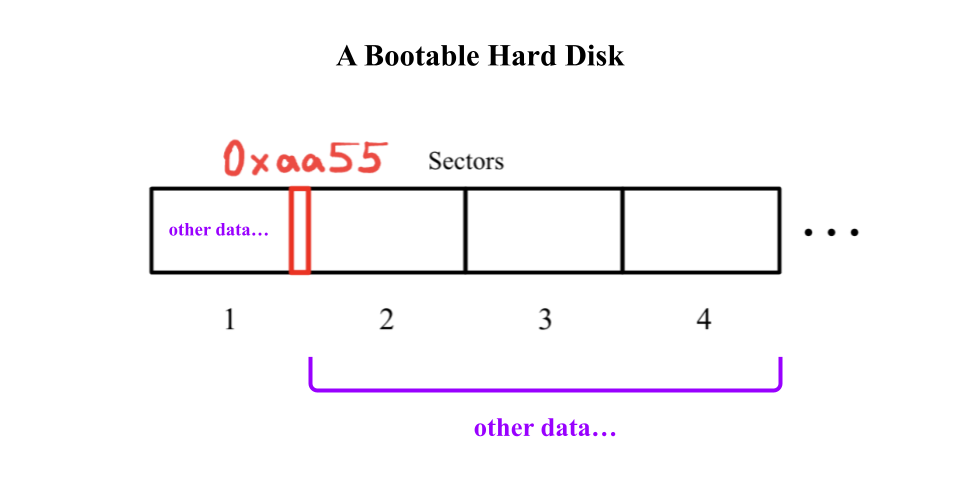
Secondary storage devices like the hard disk are split into sectors, which are 512 bytes long. If the first sector of a hard disk has the magic number 0xaa55 as its last 2 bytes (511th and 512th bytes), then the entire hard disk is considered bootable.
❓ What is
0xaa55?
0xaa55is a number where the0xprefix declares the rest of the number to be in base-16, or in hexadecimal, which has 16 digits (0-9anda-f) instead of the decimal system's 10 digits.Some other common prefixes:
0bprefixes a number in binary (base-2, with only0and1as its digits)0oprefixes a number in octal (base-8, with digits0-7)
1️⃣ We don't have 0xaa55 as the 511th and 512th bytes of our program's raw binary file, which is why it won't boot.
Remember, memory in secondary storage isn't directly usable by the CPU. In order for the CPU to start operating on our bootloader in its hard disk, it copies the first sector in the hard disk and pastes it into RAM (primary storage) specifically at memory location 0x7c00. It will then interpret the start of the first sector at 0x7c00 as computer instructions and start running them on the CPU.
If we want the machine to execute our program, 2️⃣ we need to put our program at the start of the hard disk. This allows the program to be placed at 0x7c00 in RAM where the CPU will begin executing it.
Creating a Linker Script
To recap, we have 2 things to fix:
- Place
0xaa55at the end of our program raw binary's first sector. - Place the program instructions themselves at the start of the raw binary.
Unfortunately, this cannot be done directly within Rust code. We are going to need the help of a linker script, which acts as a recipe that Rust's linker follows to generate the raw binary file.
Rust auto-generates a linker script by default, but we can override it by adding build.rs within the stage_1 directory. The build.rs file is a build script, which allows you to set configuration properties before the project is compiled.
// build.rs

fn main()
{
    println!("cargo:rustc-link-arg-bins=--script=linker.ld");
}
This build script tells us to use linker.ld as the linker script (rather than the generated default one). This file doesn't exist just yet, so let's add it:
stage_1
├── .cargo
│   └── config.toml
├── Cargo.toml
├── build.rs
├── linker.ld
└── src
    └── main.rs
build.rs and linker.ld are the newly added files.
The linker script has two components:
- One defining the entry point of the program.
- The other defining the sections of your program.
The skeleton of a linker scipt looks like this:
ENTRY(1️⃣)

SECTIONS
{
    2️⃣
}
1️⃣ is where we will be declaring our entry point, and 2️⃣ is where we define the ordering of our sections.
Creating an Entry Point
Let's start by adding an entry point to our Rust program. We'll just have it infinitely looping for now:
#![no_std]
#![no_main]

#[no_mangle]
fn entry() -> !
{
    loop {}
}

#[panic_handler]
fn panic(_: &core::panic::PanicInfo) -> !
{
    loop {}
}
...and now we update the linker script:
ENTRY(entry)

SECTIONS
{

}
❓ What is
#[no_mangle]and why is it needed?Rust allows multiple functions to have the same name, as long as they are in different scopes. For example, the following code is valid:
struct A;
struct B;

impl A { fn foo() { ... } }
impl B { fn foo() { ... } }
Notice how there are two functions both named
foo, but in different scopes.However, functions cannot have duplicate names by the time they are sent to Rust's linker. So, the compiler "mangles" these function names into some encoded (but unique) mess to be sent to the linker. For example,
A::foo()will be mangled into something like..._ZN7example3A3foo17h16fcc82fa6043ccbEIf the
entryfunction doesn't have the#[no_mangle]attribute, then the label we declared in the linker script (entry) won't match up with the mangled label in Rust, and the linker wouldn't be able to find the function our linker script refers to.So, we tell the the compiler to leave the
entryfunction unmangled with the#[no_mangle]attribute so that the linker script and the linker are on the same page.
Placing the Entry Point
We now have an entry point, but program entry points are not necessarily placed in the beginning of the produced binary. For example, Rust and C have no specification in the ordering of function placements, meaning their main entry point can be placed who knows where?
This is where the SECTIONS part of the linker script, which is where we get to define the ordering of the different sections of the program.
Rust's compiler and assembler breaks down our Rust source code into different sections in our ELF file. The 4 most commonly generated sections are...
- The
.textsection, which contains the instructions of our program. Remember that code itself is memory, and this is where they are stored. - The
.datasection keeps track of a program's global data and static variables. - The
.rodatasection keeps track of read only data like global constants. - The
.bsssection keeps track of uninitialized global data.
We can see all the sections that Rust generated for our program by using the readelf tool on Linux/Windows or x86_64-elf-readelf on macOS (which should have been installed with x86_64-elf-objcopy). First, compile the project with cargo build. Then run...
- 🐧/⊞ On Linux/Windows:
readelf -l stage_1 - On Mac:
x86_64-elf-readelf -l stage_1
...where stage_1 is the compiled ELF file by Rust, and we can see Rust generates 1 section for the program: .text.entry:

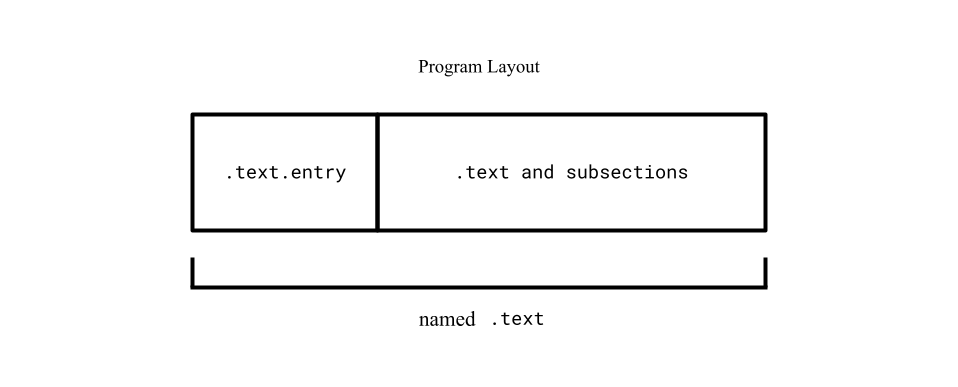
.text.entry is a subsection of its .text section. More specifically, it will contain the instructions of the entry function in our Rust source code. We can place this section at the very start of the produced raw binary by updating the linker script:
ENTRY(entry)

SECTIONS
{
    .text :
    {
        *(.text.entry)
        *(.text .text.*)
    }
}
Let's analyze this:
.text :names a new section. We can name it whatever we want, but I decided to stay consistent and name it.text.*(.text.entry)is where I specifically tell the linker to place our.text.entrysection first. This line makes.text.entrya "sub-section" of our newly created.textsection.*(.text .text.*)is where I place any other Rust-generated.textsubsections. These don't exist right now, but I'm future-proofing the linker script for when we do add more code.
⚠️ NOTE: If you recompile and run the
readelftool at this point, you'll notice the.text.entrysection doesn't show up anymore. Thereadelftool only shows top-level sections..text.entrywon't show up anymore since it's now a subsection of the newly created.text.
Because there isn't any global data, we don't have to worry about the .data, .rodata, or .bss sections.
We've effectively put our entry code at the start of our program, but there's still a problem.
Correcting Program Offsets
Remember, our bootloader will be placed at memory address 0x7c00. However, the linker by default believes the program starts at 0x0. We can verify this with the previous readelf tool output:
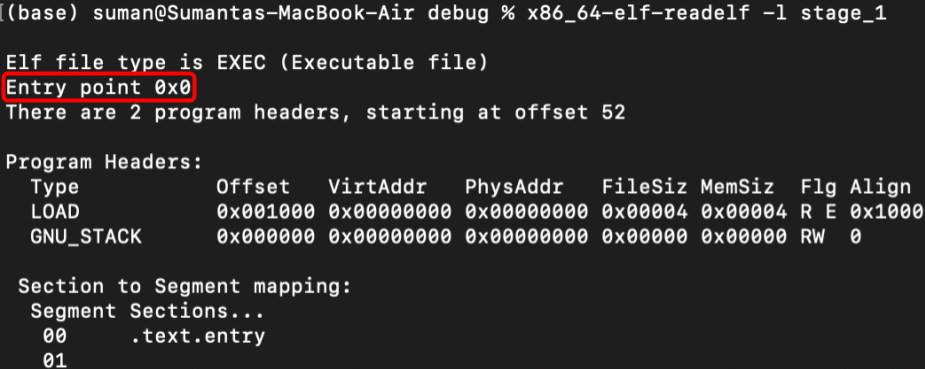
Therefore, it will set any function labels and global data to also be offset from 0x0 and if we ever call these functions or access global data from the bootloader, it will go to some uncharted region in memory near 0x0 when it's really near 0x7c00.
Instead, we need to code the right offset into our linker script so that the linker is aligned with where QEMU will actually place our program. Solving this isn't too bad...
The linker script's location counter (referred to by just the . character) stores what the current output location is. It can be thought of as a pointer to the current memory location during program generation.
By setting this location counter to 0x7c00 just before the linker generates our named .text link section, it will treat everything within the section as if it is placed directly after 0x7c00. Doing this is simple: just add the following line to the linker script...
ENTRY(entry)

SECTIONS
{
    . = 0x7c00;
    .text :
    {
        *(.text.entry)
        *(.text .text.*)
    }
}
...and we're good to go. We tell the linker to generate the .text link section as if it starts at 0x7c00, so all our function labels and data are placed at the right offset. We can confirm this by rebuilding our project with cargo build and running the readelf command again:

Placing the Boot Magic Number
Linker scripts also allows adding specific bytes in specific places. We can include the magic number 0xaa55 by adding the following link section to the script:
ENTRY(entry)

SECTIONS
{
    . = 0x7c00;
    .text :
    {
        *(.text.entry)
        *(.text .text.*)
    }

    . = 0x7c00 + 510;
    .magic_number :
    {
        SHORT(0xaa55)
    }
}
Let's go through the final linker script:
. = 0x7c00;tells the linker to treat the current "output location" to0x7c00before creating any link sections..text : { ... }tells the linker to create the.textlink section and because it is placed directly after0x7c00, all generated offsets will point to the right location in the machine's RAM.. = 0x7c00 + 510places the new location counter to0x7c00 + 510, leaving enough empty space in the middle..magic_number : { ... }is where the linker adds the.magic_numberlink section and populates it with the0xaa55magic number. The linker script usesBYTEto declare 1 byte,SHORTfor 2,QUADfor 4, etc. Since we set to location counter to0x7c00 + 510before this link section, these 2 magic-number bytes will be placed in the last 2 bytes of the generated raw binary's first sector.
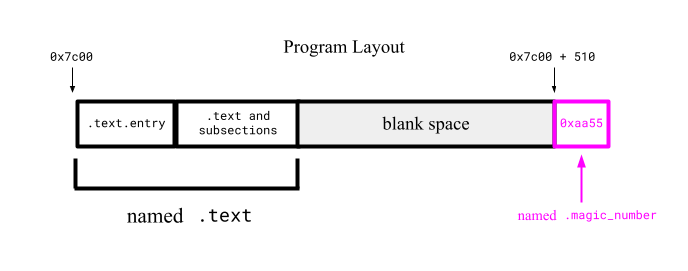
When we rebuild the Rust project and convert the compiled ELF file to a raw binary with objcopy (just as before in this section), we should have a valid runnable x86 bootloader binary file that 1️⃣ places the entry point at the start of the file, and 2️⃣ places the magic number 0xaa55 at the end of the raw binary's first sector.
You can confirm these properties if you have a built-in byte-by-byte file analyzer in your code editor (VSCode should have one). If not, you can see the byte-by-byte contents through the terminal:
/🐧 On Mac/Linux:
xxd stage_1.bin⊞ On Windows:
Format-Hex stage_1.binon Window's PowerShell (not Command Prompt).
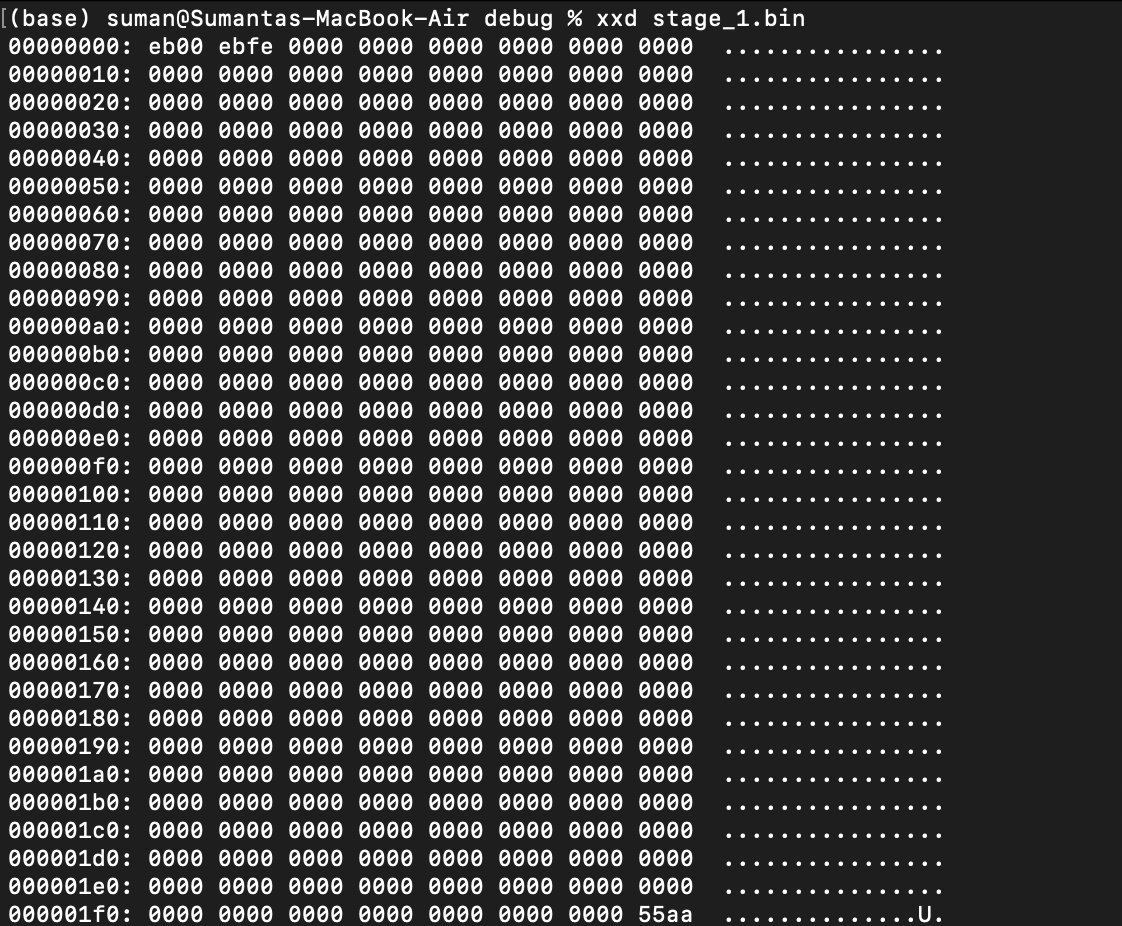
We can see the magic number 0xaa55 (could be reversed due to machine endianness, or whether your machine outputs the most-significant or least-significant byte first) placed as the last 2 bytes of the binary's first sector.
We also see some bytes placed in at the start of the file: these bytes are instructions from the entry function from Rust that we specifically told the linker to place at the start (through the .text.entry section). Everything looks good, let's convert the compiled ELF file into a raw binary...
objcopy -I elf32-i386 -O binary stage_1 stage_1.bin
...and run it on QEMU:
qemu-system-x86_64 -drive format=raw,file=stage_1.bin
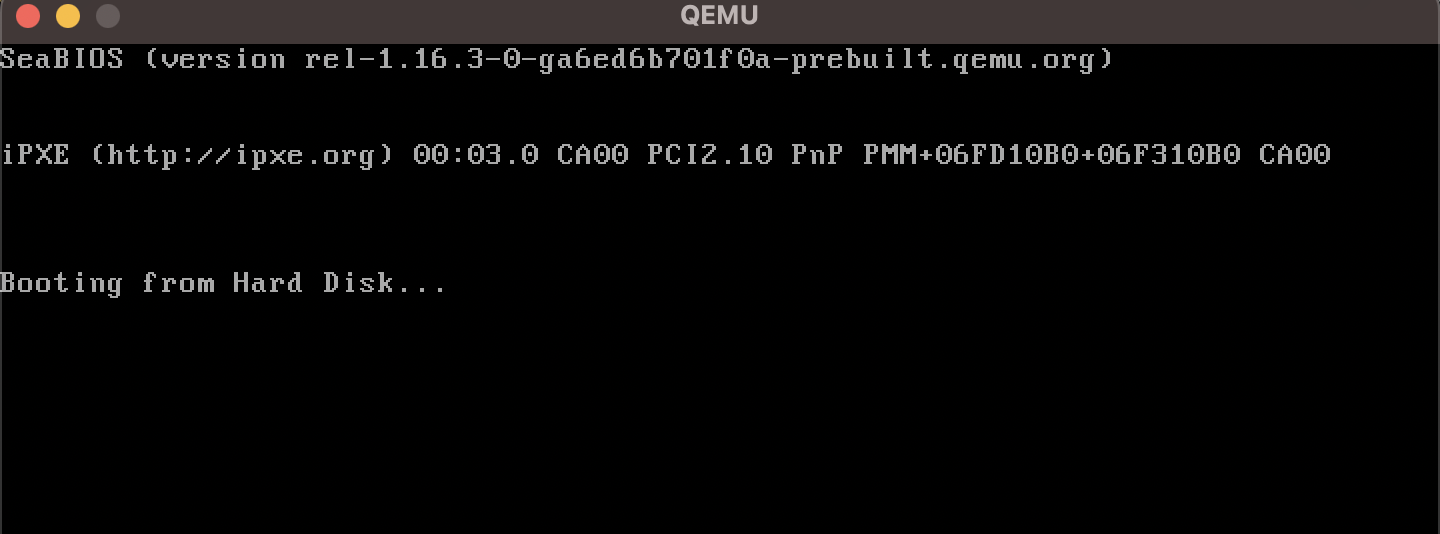
The emulator detected our hard disk to be a bootable device and hangs due to the infinite loop within Rust's entry function. Perfect!
We finally have a runnable stage 1 bootloader on x86 emulators and machines. In the next section, we'll actually begin development in Rust so that our bootloader does more than just infinitely hang.