TODO: delete all Cargo.lock files
❓ Is there a source code reference for this blog?
The final source code at the end of every blog post can be found within the
scratch_os-blog-src/directory within this blog's GitHub Repository to be used as a reference as you read through the blog.
Introduction
Let's make an operating system in Rust. An operating system is the layer of abstraction between a computer's hardware and software.
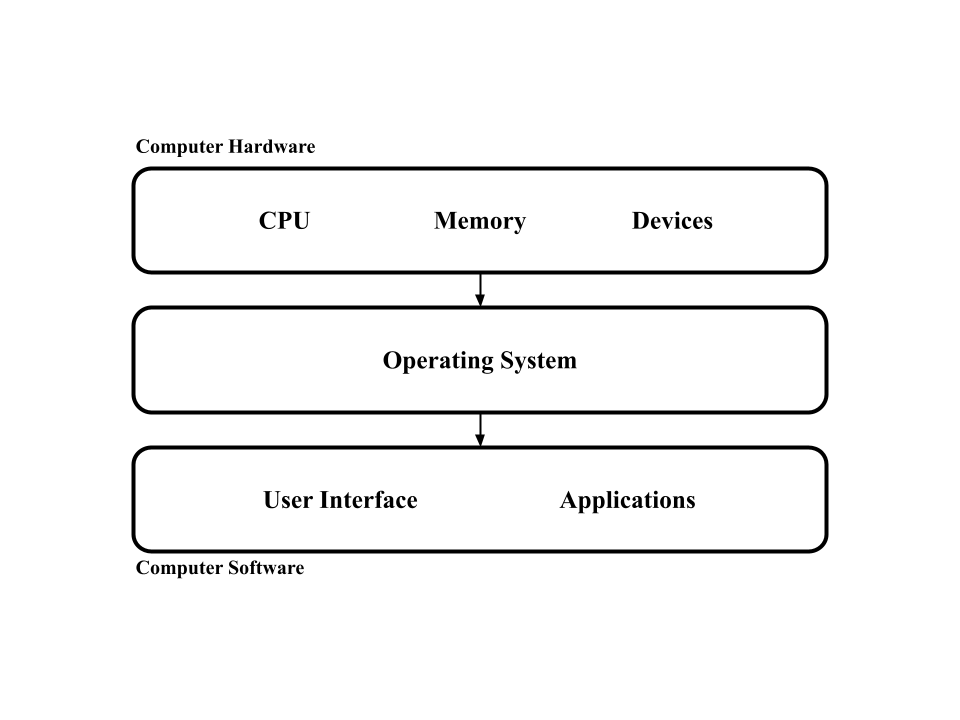
It allows users like you and I to utilize the fullest potential of their computer's hardware without worrying about the inner details of the hardware. This is a very broad definition because the operating system is responsible for a broad range of tasks like memory, processes, networking, concurrency, etc.
Our goal will be to write an operating system in Rust without any dependencies! Just Rust and its core library (thus the name scratchOS, we're writing this kind of from scratch). This probably isn't feasable for industry-level operating systems, but is great to learn about embedded programming as you get to build everything from the bottom up.
How Does an Operating System Run?
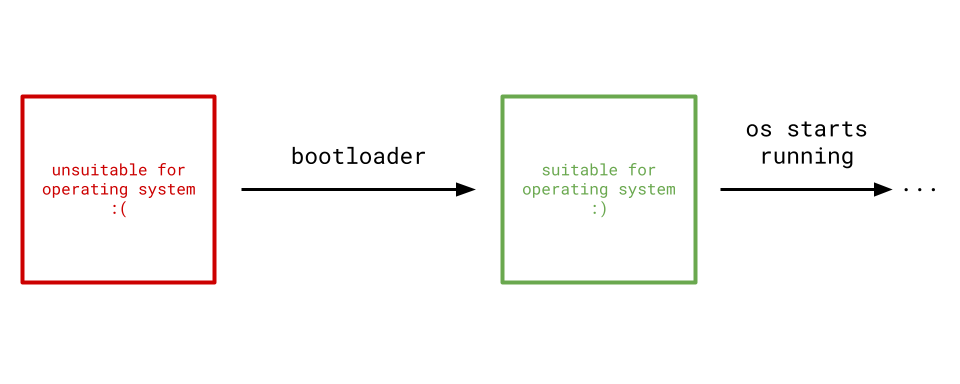
When a machine is first powered on, it is generally not in a suitable state for a legitimate operating system. It is the bootloader's job to morph the state of the machine's hardware into one that an operating system will like.
Since we're writing this with no dependencies, I'll be spending the first few chapters building a bootloader. Even though a bootloader and an operating system are two completely disjoint pieces of software, they share a lot of common covered concepts. I found myself having a much easier time with operating system development when I first wrote a bootloader. The bootloader I'll build in this tutorial will be minimal, including only what is necessary to reach the operating system.
For Which Architecture?
Before we start writing code, we want to choose which computer architecture we want our bootloader and operating system to run on. Different computer architectures have different hardware specs and instruction sets that drastically affects how you write your bootloader and operating system.
The two most common ones are...
x86, which Windows, Linux, and older Intel-based Macs use.arm, which newer Macs use.
The x86 architecture is by far the most well-documented architecture for bootloader and OS development, so that’s what I’ll use.
Writing the Stage 1 Bootloader
Before starting on an operating system, I'll spend the first few chapters writing a bootloader for our operating system.
Due to the nature of the machine's environment when first powered on (which will be covered later this chapter), it's not feasable to write the bootloader in one program. Instead, bootloaders are commonly split into different programs called stages, where each stage is responsible for bringing the machine closer and closer to an environment suitable for an operating system.
The bootloader itself in this tutorial will be split into 3 different stages. This section will be about writing its first stage.
A Bare Metal x86 Rust Binary
Rust code by default generates programs that are run on your personal machine, which may or may not be the right architecture (x86). The goal of this section is to create a Rust project that compiles specifically for the desired x86 architecture, regardless of what your personal machine's architecture is.
🚨 DISCLAIMER: Even if your machine is x86, Rust will almost certainly not produce a binary suitable for an x86 machine when it is first powered on!! These two environments are very different. You'll (unfortunately) still need to do all the setup.
The project will contain a kernel and the first stage bootloader for now. My recommendation is to structure your project something like...
scratch_os
├── bootloader
│   └── stage_1
│       ├── Cargo.toml
│       └── src
│           └── main.rs
└── kernel
...where kernel is an empty directory for now. If you're on a UNIX system, creating this structure on the terminal looks something like...
mkdir scratch_os
cd scratch_os
mkdir bootloader
mkdir kernel
cd bootloader
cargo new stage_1
cargo new stage_1 will automatically set up the stage_1 directory for us and populate main.rs with a simple Hello, World! program. We'll reuse this once we get to stages 2 and 3 for the bootloader. Let's start writing the bootloader.
Unlinking with the Standard Library
cargo's auto-generated project has a few problems. Firstly, Rust by default links with its standard library when generating executables. In general, the Rust standard library requires OS-dependent features like a heap, networking, threads, etc. Because we don't have an operating system, we can't link to the Rust standard library. Disabling this is pretty easy, we just need to include the #![no_std] attribute to the very top of main.rs.
#![no_std]

fn main()
{
    println!("Hello, World");
}
We can generate the program by executing the terminal command cargo build inside the stage_1 directory. 3 compile-time errors show up in our code.

❓ Why
cargo buildand notcargo run?
cargo runnot only compiles the project but also executes it on your personal machine. Remember, this project is intended to compile for an x86 machine on start-up.cargo buildjust compiles the project without executing it.
The first two are pretty easy to solve...
- It turns out that Rust's
println!macro requires the standard library, so we can't use it. - Whenever Rust encounters unsound code at runtime (like an out-of-bounds error), it invokes its panic handler, which is defined by its standard library. Without the standard library, we must write our own panic handler, and for now, we will just infinitely loop.
#![no_std]

fn main() { }

#[panic_handler]
fn panic(_: &core::panic::PanicInfo) -> !
{
    loop {}
}
The third error specifies that the eh_personality language item is required. Its error message gives some useful information. It seems like the default target requires this eh_personality language item, but we can specify a target that doesn't.
ℹ️ INFO: Some compilers might provide a different error message with nothing about
eh_personality:

Regardless, part of this error is about the default "panic strategy" that Rust uses.
Specifying the x86 Target
By default, Rust compiles for your personal machine's target triplet, which describes the platform of a machine. A target triple contains its...
- Computer architecture (talked about in the Introduction),
- The vendor, or who supplied the machine,
- And the machine's operating system.
- We can also optionally supply an environment field. We'll actually be needing this.
Each one of these fields are separated by dashes. You can run the terminal command...
rustc --version --verbose
...to see what target triplet Rust is currently compiling for on your machine, next to host:. Most likely, it's not the target triplet of the specific platform that we want.
ℹ️ INFO: The idea of compiling a program for a different platform that isn't your own is called cross compiling. When doing OS development in C/C++, installing and setting up a "cross compiler" is not trivial.
Thankfully, every Rust compiler is a cross compiler, meaning it has the ability to compile for other platforms besides its host platform.
Let's construct a target triplet for an x86 machine on start-up. We'll then specify to Rust that we want to compile for this particular target triplet.
❗ IMPORTANT An x86 machine on start-up begins in 16-bit real mode. This will be important when figuring out its target triplet.
-
The three most commonly used computer architectures in a target triplet are...
aarch64covers machines with thearmarchitecture.i686covers the 16-bit and 32-bit versions ofx86.x86_64covers the 64-bit version ofx86.
Since an x86 machine begins in 16-bit real mode, its target triplet computer architecture is
i686. -
We are the vendors for this platform. Unfortunately, "we" are not part of the list of approved target triplet vendors. Thankfully, we can put
unknownfor that field. -
We don't have an operating system, so we can similarly specify
nonefor the field. -
Recall that a target triplet can optionally contain a fourth environment field The
i686architecture covers both 16-bit and 32-bit versions ofx86, but we can emphasize this platform's 16-bit environment by adding thecode16environment field.
Overall, the target triplet of an x86 machine on start-up is...
i686-unknown-node-code16
However, a target triple is one component of an overall target and isn't enough in this case. The way you specify a target (not just a target triple) is through a JSON file. The minimum JSON file for the i686-unknown-node-code16 target triplet is...
{
    "llvm-target": "i686-unknown-none-code16",
    "arch": "x86",
    "data-layout": "e-m:e-p:32:32-p270:32:32-p271:32:32-p272:64:64-i128:128-f64:32:64-f80:32-n8:16:32-S128",
    "target-pointer-width": "32"
}
This JSON further specifies x86 as the target's architecture. The data-layout and target-pointer-width tags specify required properties about the architecture like data types (floats, integers, pointers), stack alignment, etc.
This is where we will resolve the third eh_personality error. The eh stands for "exception handling", and Rust typically inserts a stack unwinding procedure after a panic so that no resources are leaked. This procedure, however, requires OS-specific support which we don't have.
Instead, we can change Rust's panic strategy to just abort on panic without running any clean-up procedure. We specify this by adding the following line to our JSON file:
"panic-strategy": "abort"
Since the panic strategy doesn't require any OS-dependent features anymore, the eh_personality error shouldn't be an issue.
Right now, the target file is just a standalone JSON file. Following the eh_personality error message feedback, we can tell Rust to compile for the target specified in this JSON file through its .cargo/config.toml file, which isn't present yet. Let's add this .cargo/config.toml file to the stage_1 directory...
stage_1
├── .cargo
│   └── config.toml
├── Cargo.toml
└── src
    └── main.rs
The target JSON file's location (wherever you choose to store it) can be specified within this config.toml file,
[build]
target = "relative-path/from-stage-1-dir/to-your/x86-16-bit.json"
We will need multiple target specifications as we write the bootloader/operating system, so my recommendation is to have a target_specs directory just underneath the root scratch_os directory to store all the target specifications.
Now when I run the project, the eh_personality error disappears, but there's a few more issues that come up:
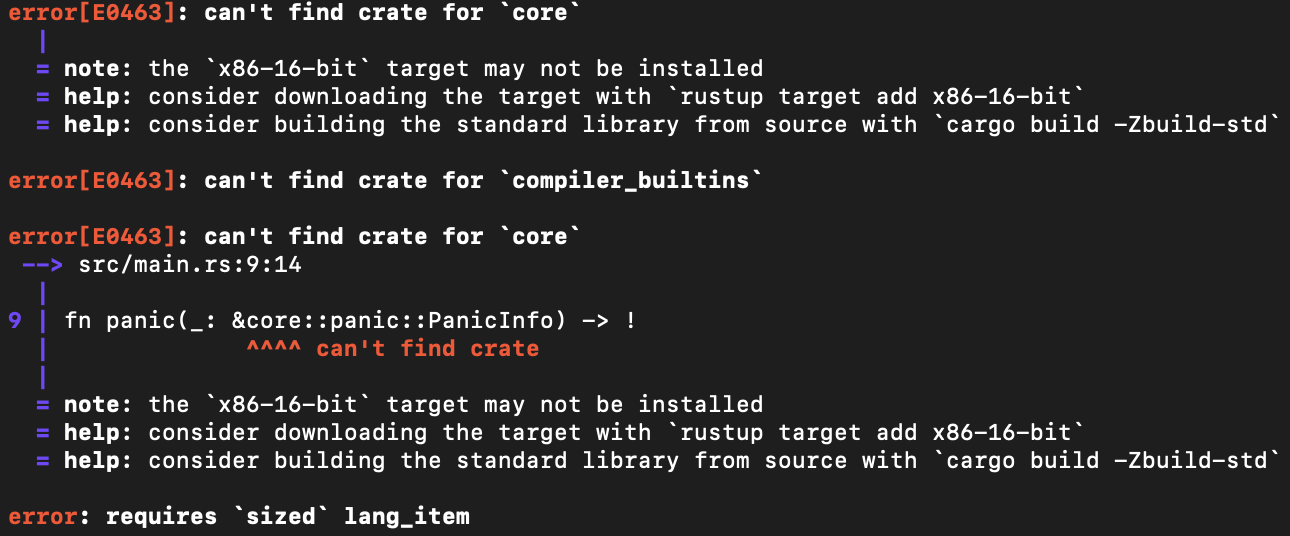
It seems like Rust can't find the core and compiler-builtins crates.
Compiling Core Crates
A Rust project may link without a standard library, but it must at least contain the core and compiler_builtins crates. These crates come precompiled for the most popular target triplets when we first install Rust. However, because we defined our customized target through a JSON file, Rust doesn't contain these crates pre-built for it.
Thankfully, we have the ability to compile these crates on-demand by adding this to the .cargo/config.toml file...
[unstable]
build-std = ["core", "compiler_builtins"]
This feature is still relatively new which is why it is marked with an unstable tag.
However, Rust's compiler is set to the stable channel by default, meaning all functionality this compiler provides is guaranteed to be valid forever in all future Rust versions. This however means that you cannot use any unstable features.
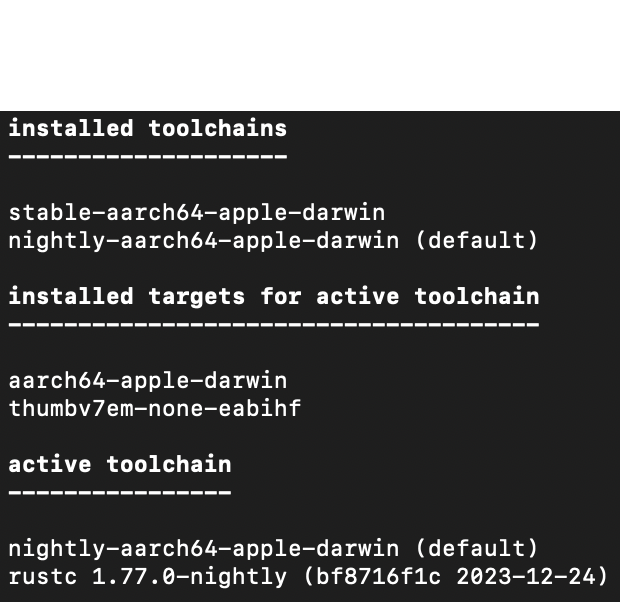
The nightly channel, on the otherhand, allows you to use unstable Rust features. This also means that these may be removed on a "nightly" basis. These specific unstable core crates feature has been available and valid since at least 2020, so I think it's safe to use it. Changing our Rust toolchain to "nightly" is very simple. Just run...
rustup default nightly
...on your terminal and you're good to go. To confirm that you really are using the nightly toolchain, you can run...
rustup show
...on your terminal and if you see that the nightly toolchain is the default one under the installed toolchains section, you're good to go. This is how it looks like for me...
Overwriting Rust's Entry Point
Now when we compile, there is one more error to fix where we are missing a start language item...

Most programming languages have what's called a runtime system, which is a wrapper around the typical main function that sets up the stack and inserts arguments into the correct places before main begins and cleans up resources used after main finished.
Rust has a runtime system but we don't have access to it without the standard library. A main function implies the use of Rust's runtime system, so we want to not have a main function at all by specifying the #![no_main] attribute and removing the old main function. The Rust file now looks like...
#![no_std]
#![no_main]

#[panic_handler]
fn panic(_: &core::panic::PanicInfo) -> !
{
    loop {}
}
There is one last linker error:

To simplify, Rust's runtime system includes a C runtime system, so Rust projects uses C's cc linker by default, which expects a C runtime system. However, because we don't have a Rust runtime system, there of course isn't a C runtime system. Instead, we will use Rust's linker rust-lld, which does not require any runtime system, by adding these two key/value pairs to the target specification JSON file:
"linker": "rust-lld",
"linker-flavor": "ld.lld"
One last addition: By default, programs are expected to operate regardless of where they are in memory. This means any memory access will be relative to the program's start.
Our bootloader, however, requires precise control over memory: all memory accesses need to be exactly that place in memory, not some relative offset from the program start. The following addition:
"relocation-model": "static"
...overrides the default behavior, forcing the program to use absolute addressing mode and giving our bootloader the precise control it needs over memory.
Finally, Rust successfully compiles the freestanding executable at...
scratch_os/bootloader/stage_1/target/<name_of_your_json_file>/debug/stage_1
...without any errors! Granted, we can’t do much with it right now (there isn't even an entry point), but it is a completely valid x86 executable that is entirely OS-independent!
In the next section, we will make our executable useful by making it runnable on an x86 machine.
Writing a Boot Sector
We have a freestanding Rust binary designed for the x86 architecture, but it's still not quite ready yet for an x86 machine on start-up.
Creating a Raw Binary File
An x86 machine on start-up expects a raw binary file as a bootloader. Let's see the format of our current executable...
/🐧 On Mac/Linux: The
filecommand allows us to see the format of any specified file.⊞ On Windows: The
filecommand on Windows is accessible inside the MSYS2 Shell which can be installed through https://www.msys2.org/. This shell will be needed for installing future command line tools as well.

The Rust compiler generated a file in the ELF format, which is essentially a binary file with a bunch of associated metadata. An x86 machine on start-up is not expecting any of this metadata when it runs our program, so our task is now to strip it from our generated file.
Thankfully, there is a command line tool called objcopy that precisely strips metadata from ELF files.
🐧 On Linux:
objcopyis installed on Linux machines by default. On Mac: Running
brew install x86_64-elf-binutilsallows you to use thex86_64-elf-objcopytool, which is the same as Window's and Linux'sobjcopy.⊞ On Windows:
If you haven't already, install the MSYS2 Shell through https://www.msys2.org/.
Running
pacman -S mingw-w64-x86_64-binutilswithin the MSYS2 Shell installsobjcopyon your machine.❗ IMPORTANT:
objcopywill be usable within Window's default Command Prompt, not the MSYS2 shell.If you still cannot run
objcopy, make sure thatC:\mysys64\mingw64\bin(MSYS2 Shell's binaries directory) is part of your system'sPathenvironment variable.
- Navigate to your system's environment variables under
Control Panel.- Under
System variables, addC:\mysys64\mingw64\binto thePathvariable. Restart your shell andobjcopyshould be usable now.You can verify installation by running
objcopy --versionon Linux and Windows orx86_64-elf-objcopyon the Mac.
The objcopy command has the following format:
objcopy -I <input-format> -O <output-format> <input-file> <output-location>
Let's go through each of these fields:
- The specific
<input-format>of the generated file iself32-i386, and we can see this matches with what command-line tools say the format of the file is:

- We want the
<output-format>to be a rawbinaryfile. - The
<input-file>we want to convert is thestage_1compiled file. - I'll call the
<output-location>asstage_1.bin, emphasizing that this file is a raw binary file.
The final command to run (within the directory with your compiled stage_1 file) is:
objcopy -I elf32-i386 -O binary stage_1 stage_1.bin
🚨 REMINDER: If you are on a Mac , remember to write
x86_64-elf-objcopyinstead of justobjcopy.
We finally have a file, stage_1.bin, in the format that an x86 machine on start-up would like. Let's run it.
The QEMU Emulator
Testing your bootloader and your operating system on an actual computer is difficult as every time any change is made, you need to burn your project onto a USB stick and reboot your machine. If you develop with only one machine, constantly switching and rebooting between the operating system your making and the operating system you're developing on will really slow down any progress you're making.
Instead, we are going to use an emulator, which emulates the hardware of a regular computer. This allows you to develop and test on one machine without needing constant reboots.
QEMU is definitely the most popular emulator used for OS development. You can find installation instructions at https://www.qemu.org/download/.
Installing QEMU should allow you to use the qemu-system-x86_64 command, which emulates an x86 machine. Run qemu-system-x86_64 --version on your terminal to verify that it's there. This is nice because after we are done with setup, it won't matter which architecture your machine uses as we will all be developing for x86 through the QEMU's x86 emulator.
We can run our generated stage_1.bin file on QEMU with the command...
qemu-system-x86_64 -drive format=raw,file=stage_1.bin
After a few seconds, QEMU will complain that there is No bootable device.
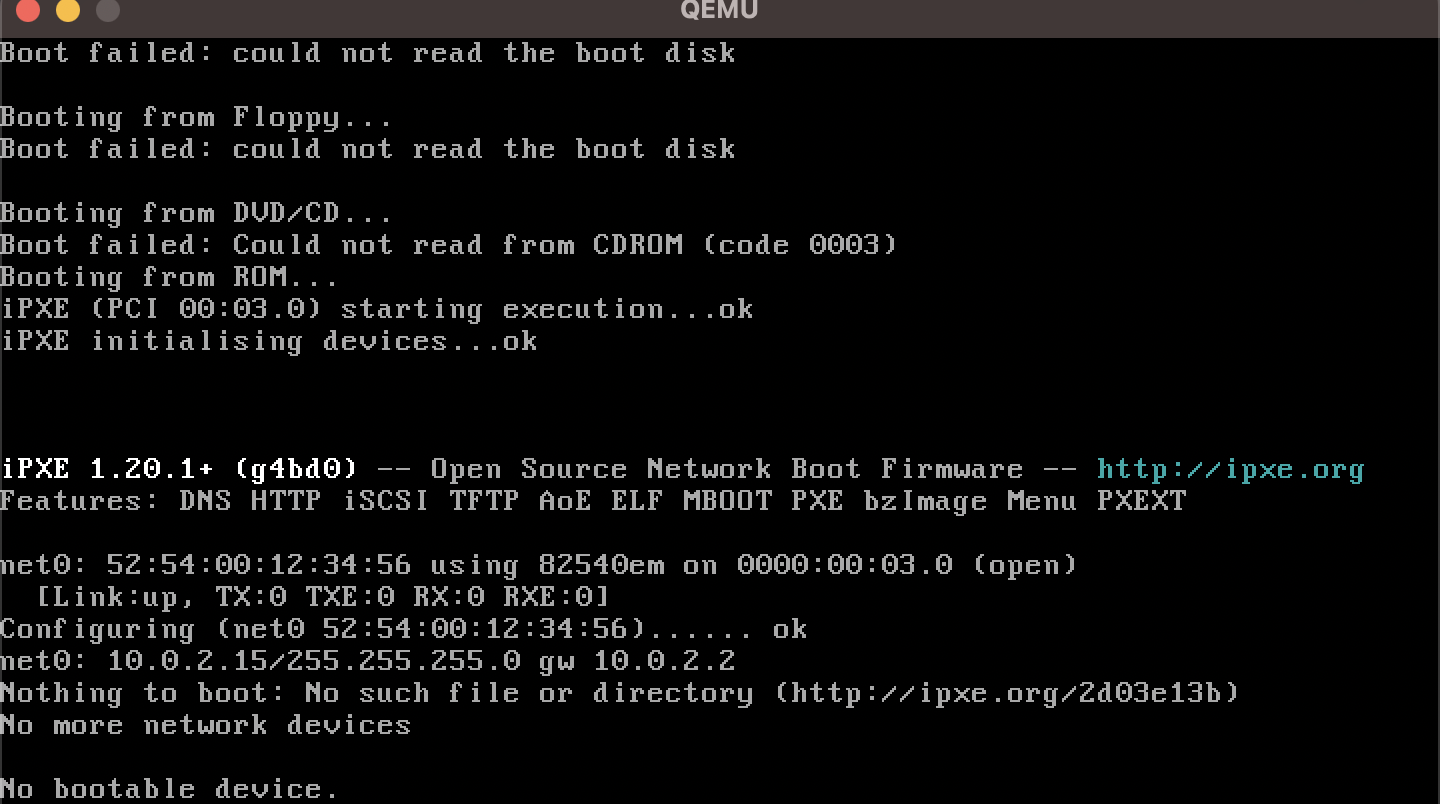
QEMU isn't recognizing our binary file as valid bootable code. Let's revisit exactly how QEMU and other x86 machines on start-up handle the booting process.
What Went Wrong? Revisiting the Booting Process
The command tells QEMU to treat our binary file stage_1.bin as its emulated hard disk, which is a type of secondary storage.
A Quick Computer Architecture Tour
A computer's central processing unit (CPU) is the hardware computer that is responsible for running computer instructions.
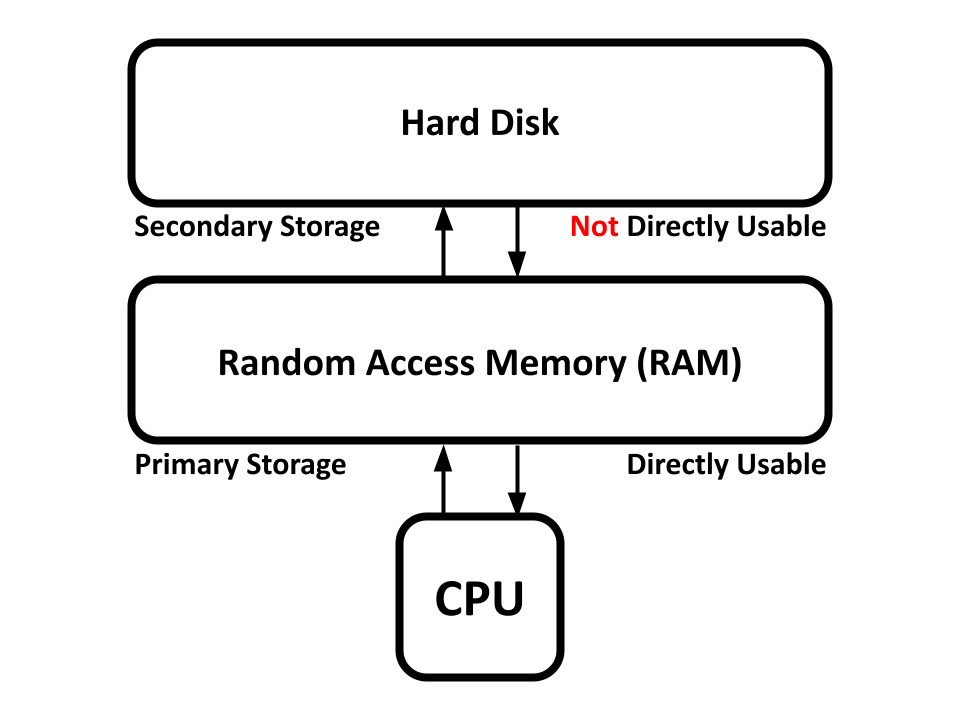
However, running instructions isn't useful if you don't have memory to work with. Random Access Memory (RAM) is a form of primary memory storage that a CPU can directly work with.
Secondary memory storages (like the hard disk) are usually significantly larger than primary storage, but cannot directly be used by the CPU. Memory from secondary storage must first be copied over to primary storage before the CPU can work on it.
A computer's primary storage is generally wiped and reset every time a computer is powered on. Memory in secondary storage, on the other hand, persists throughout computer start-ups. This is why bootloaders and kernels are kept in secondary storage, so they don't get wiped and deleted in primary storage on a power off.
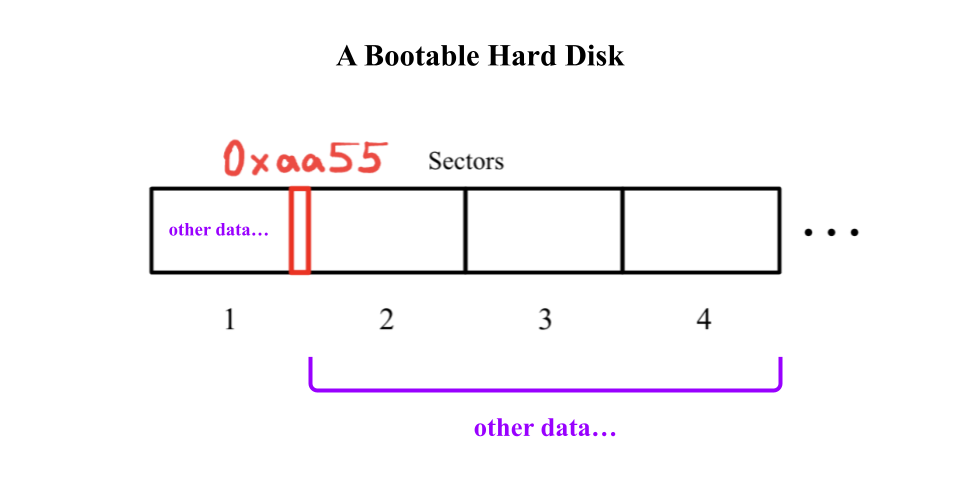
Secondary storage devices like the hard disk are split into sectors, which are 512 bytes long. If the first sector of a hard disk has the magic number 0xaa55 as its last 2 bytes (511th and 512th bytes), then the entire hard disk is considered bootable.
❓ What is
0xaa55?
0xaa55is a number where the0xprefix declares the rest of the number to be in base-16, or in hexadecimal, which has 16 digits (0-9anda-f) instead of the decimal system's 10 digits.Some other common prefixes:
0bprefixes a number in binary (base-2, with only0and1as its digits)0oprefixes a number in octal (base-8, with digits0-7)
1️⃣ We don't have 0xaa55 as the 511th and 512th bytes of our program's raw binary file, which is why it won't boot.
Remember, memory in secondary storage isn't directly usable by the CPU. In order for the CPU to start operating on our bootloader in its hard disk, it copies the first sector in the hard disk and pastes it into RAM (primary storage) specifically at memory location 0x7c00. It will then interpret the start of the first sector at 0x7c00 as computer instructions and start running them on the CPU.
If we want the machine to execute our program, 2️⃣ we need to put our program at the start of the hard disk. This allows the program to be placed at 0x7c00 in RAM where the CPU will begin executing it.
Creating a Linker Script
To recap, we have 2 things to fix:
- Place
0xaa55at the end of our program raw binary's first sector. - Place the program instructions themselves at the start of the raw binary.
Unfortunately, this cannot be done directly within Rust code. We are going to need the help of a linker script, which acts as a recipe that Rust's linker follows to generate the raw binary file.
Rust auto-generates a linker script by default, but we can override it by adding build.rs within the stage_1 directory. The build.rs file is a build script, which allows you to set configuration properties before the project is compiled.
// build.rs

fn main()
{
    println!("cargo:rustc-link-arg-bins=--script=linker.ld");
}
This build script tells us to use linker.ld as the linker script (rather than the generated default one). This file doesn't exist just yet, so let's add it:
stage_1
├── .cargo
│   └── config.toml
├── Cargo.toml
├── build.rs
├── linker.ld
└── src
    └── main.rs
build.rs and linker.ld are the newly added files.
The linker script has two components:
- One defining the entry point of the program.
- The other defining the sections of your program.
The skeleton of a linker scipt looks like this:
ENTRY(1️⃣)

SECTIONS
{
    2️⃣
}
1️⃣ is where we will be declaring our entry point, and 2️⃣ is where we define the ordering of our sections.
Creating an Entry Point
Let's start by adding an entry point to our Rust program. We'll just have it infinitely looping for now:
#![no_std]
#![no_main]

#[no_mangle]
fn entry() -> !
{
    loop {}
}

#[panic_handler]
fn panic(_: &core::panic::PanicInfo) -> !
{
    loop {}
}
...and now we update the linker script:
ENTRY(entry)

SECTIONS
{

}
❓ What is
#[no_mangle]and why is it needed?Rust allows multiple functions to have the same name, as long as they are in different scopes. For example, the following code is valid:
struct A;
struct B;

impl A { fn foo() { ... } }
impl B { fn foo() { ... } }
Notice how there are two functions both named
foo, but in different scopes.However, functions cannot have duplicate names by the time they are sent to Rust's linker. So, the compiler "mangles" these function names into some encoded (but unique) mess to be sent to the linker. For example,
A::foo()will be mangled into something like..._ZN7example3A3foo17h16fcc82fa6043ccbEIf the
entryfunction doesn't have the#[no_mangle]attribute, then the label we declared in the linker script (entry) won't match up with the mangled label in Rust, and the linker wouldn't be able to find the function our linker script refers to.So, we tell the the compiler to leave the
entryfunction unmangled with the#[no_mangle]attribute so that the linker script and the linker are on the same page.
Placing the Entry Point
We now have an entry point, but program entry points are not necessarily placed in the beginning of the produced binary. For example, Rust and C have no specification in the ordering of function placements, meaning their main entry point can be placed who knows where?
This is where the SECTIONS part of the linker script, which is where we get to define the ordering of the different sections of the program.
Rust's compiler and assembler breaks down our Rust source code into different sections in our ELF file. The 4 most commonly generated sections are...
- The
.textsection, which contains the instructions of our program. Remember that code itself is memory, and this is where they are stored. - The
.datasection keeps track of a program's global data and static variables. - The
.rodatasection keeps track of read only data like global constants. - The
.bsssection keeps track of uninitialized global data.
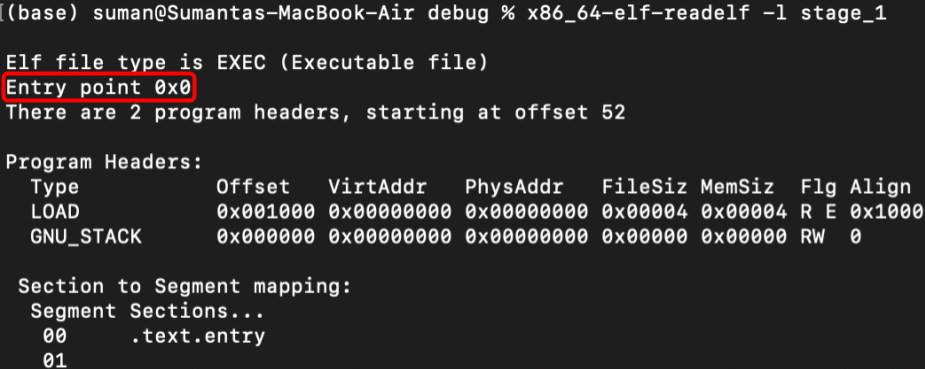
We can see all the sections that Rust generated for our program by using the readelf tool on Linux/Windows or x86_64-elf-readelf on macOS (which should have been installed with x86_64-elf-objcopy). First, compile the project with cargo build. Then run...
- 🐧/⊞ On Linux/Windows:
readelf -l stage_1 - On Mac:
x86_64-elf-readelf -l stage_1
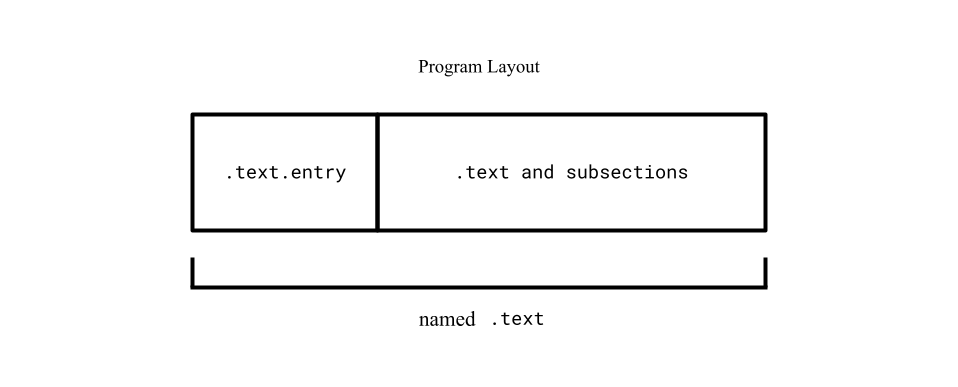
...where stage_1 is the compiled ELF file by Rust, and we can see Rust generates 1 section for the program: .text.entry:

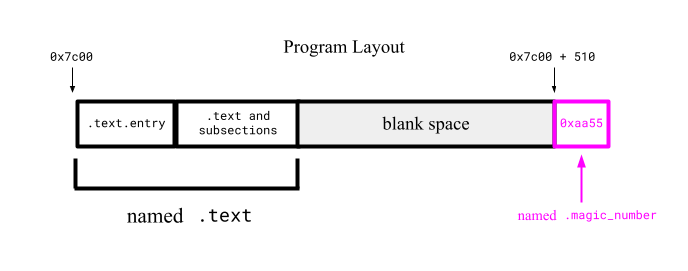
.text.entry is a subsection of its .text section. More specifically, it will contain the instructions of the entry function in our Rust source code. We can place this section at the very start of the produced raw binary by updating the linker script:
ENTRY(entry)

SECTIONS
{
    .text :
    {
        *(.text.entry)
        *(.text .text.*)
    }
}
Let's analyze this:
.text :names a new section. We can name it whatever we want, but I decided to stay consistent and name it.text.*(.text.entry)is where I specifically tell the linker to place our.text.entrysection first. This line makes.text.entrya "sub-section" of our newly created.textsection.*(.text .text.*)is where I place any other Rust-generated.textsubsections. These don't exist right now, but I'm future-proofing the linker script for when we do add more code.
⚠️ NOTE: If you recompile and run the
readelftool at this point, you'll notice the.text.entrysection doesn't show up anymore. Thereadelftool only shows top-level sections..text.entrywon't show up anymore since it's now a subsection of the newly created.text.
Because there isn't any global data, we don't have to worry about the .data, .rodata, or .bss sections.
We've effectively put our entry code at the start of our program, but there's still a problem.
Correcting Program Offsets
Remember, our bootloader will be placed at memory address 0x7c00. However, the linker by default believes the program starts at 0x0. We can verify this with the previous readelf tool output:
Therefore, it will set any function labels and global data to also be offset from 0x0 and if we ever call these functions or access global data from the bootloader, it will go to some uncharted region in memory near 0x0 when it's really near 0x7c00.
Instead, we need to code the right offset into our linker script so that the linker is aligned with where QEMU will actually place our program. Solving this isn't too bad...
The linker script's location counter (referred to by just the . character) stores what the current output location is. It can be thought of as a pointer to the current memory location during program generation.
By setting this location counter to 0x7c00 just before the linker generates our named .text link section, it will treat everything within the section as if it is placed directly after 0x7c00. Doing this is simple: just add the following line to the linker script...
ENTRY(entry)

SECTIONS
{
    . = 0x7c00;
    .text :
    {
        *(.text.entry)
        *(.text .text.*)
    }
}
...and we're good to go. We tell the linker to generate the .text link section as if it starts at 0x7c00, so all our function labels and data are placed at the right offset. We can confirm this by rebuilding our project with cargo build and running the readelf command again:

Placing the Boot Magic Number
Linker scripts also allows adding specific bytes in specific places. We can include the magic number 0xaa55 by adding the following link section to the script:
ENTRY(entry)

SECTIONS
{
    . = 0x7c00;
    .text :
    {
        *(.text.entry)
        *(.text .text.*)
    }

    . = 0x7c00 + 510;
    .magic_number :
    {
        SHORT(0xaa55)
    }
}
Let's go through the final linker script:
. = 0x7c00;tells the linker to treat the current "output location" to0x7c00before creating any link sections..text : { ... }tells the linker to create the.textlink section and because it is placed directly after0x7c00, all generated offsets will point to the right location in the machine's RAM.. = 0x7c00 + 510places the new location counter to0x7c00 + 510, leaving enough empty space in the middle..magic_number : { ... }is where the linker adds the.magic_numberlink section and populates it with the0xaa55magic number. The linker script usesBYTEto declare 1 byte,SHORTfor 2,QUADfor 4, etc. Since we set to location counter to0x7c00 + 510before this link section, these 2 magic-number bytes will be placed in the last 2 bytes of the generated raw binary's first sector.
When we rebuild the Rust project and convert the compiled ELF file to a raw binary with objcopy (just as before in this section), we should have a valid runnable x86 bootloader binary file that 1️⃣ places the entry point at the start of the file, and 2️⃣ places the magic number 0xaa55 at the end of the raw binary's first sector.
You can confirm these properties if you have a built-in byte-by-byte file analyzer in your code editor (VSCode should have one). If not, you can see the byte-by-byte contents through the terminal:
/🐧 On Mac/Linux:
xxd stage_1.bin⊞ On Windows:
Format-Hex stage_1.binon Window's PowerShell (not Command Prompt).
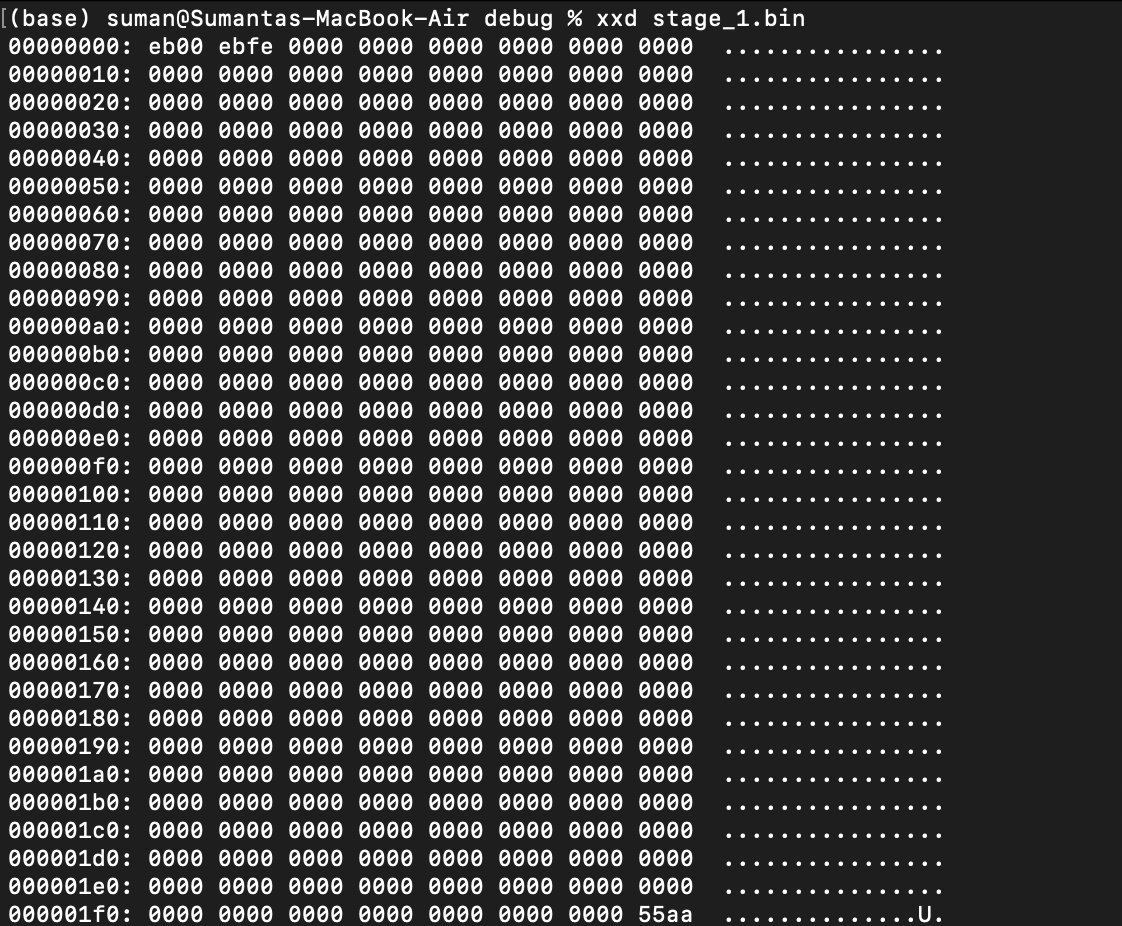
We can see the magic number 0xaa55 (could be reversed due to machine endianness, or whether your machine outputs the most-significant or least-significant byte first) placed as the last 2 bytes of the binary's first sector.
We also see some bytes placed in at the start of the file: these bytes are instructions from the entry function from Rust that we specifically told the linker to place at the start (through the .text.entry section). Everything looks good, let's convert the compiled ELF file into a raw binary...
objcopy -I elf32-i386 -O binary stage_1 stage_1.bin
...and run it on QEMU:
qemu-system-x86_64 -drive format=raw,file=stage_1.bin
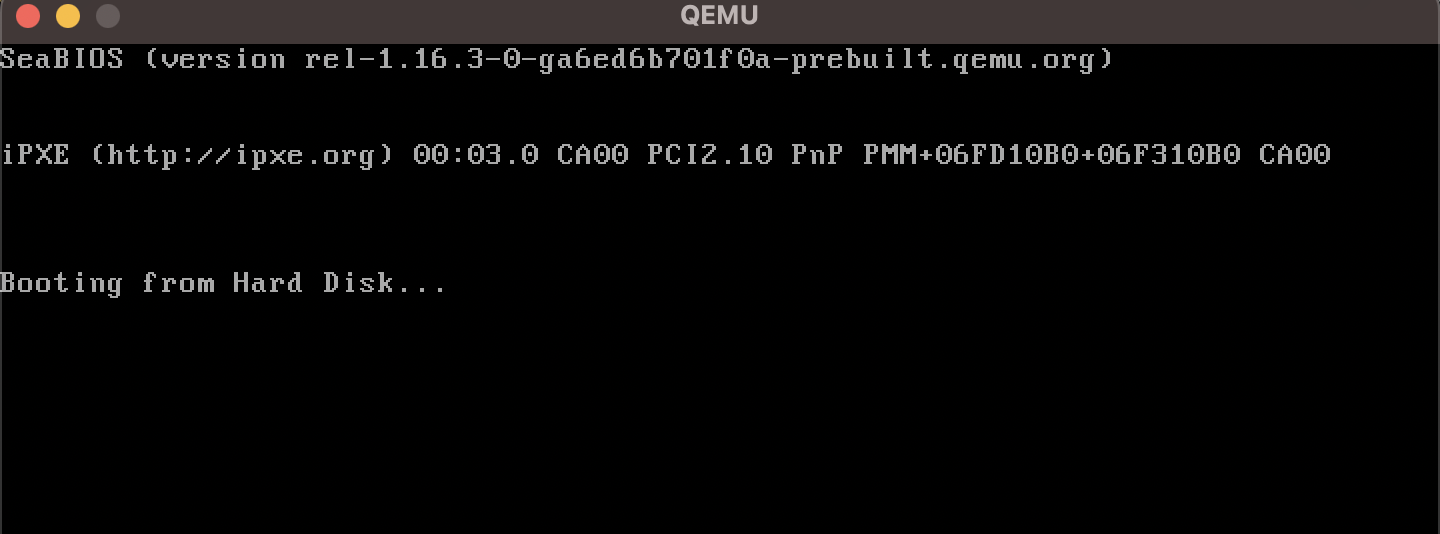
The emulator detected our hard disk to be a bootable device and hangs due to the infinite loop within Rust's entry function. Perfect!
We finally have a runnable stage 1 bootloader on x86 emulators and machines. In the next section, we'll actually begin development in Rust so that our bootloader does more than just infinitely hang.
Exploring the Machine's Environment
One thing before we start, running the commands to generate and run our raw binary over and over again is a bit tedious, so my recommendation is to find some way to automate it. A shell script at the top-level directory scratch_os/ would look like...
cd bootloader/stage_1/
cargo build --release
cd target/<name_of_your_json_file>/release/
objcopy -I elf32-i386 -O binary stage_1 stage_1.bin
qemu-system-x86_64 -drive format=raw,file=stage_1.bin
Macs would use
x86_64-elf-objcopyinstead ofobjcopy.
🔔 REMINDER:
<name_of_your_json_file>is whatever you named your x86 16-bit target specification JSON file (created in Section 1.1) as this is what Rust uses to generate the directory it stores its compiled artifacts in.
❓ 1. What is the
--releaseoption incargo build?When Rust compiles a project through
cargo buildorcargo run, it compiles without optimizations by default to allow for the best debugging information for bugfixing and troubleshooting. This is problematic in our case as it would take very little code to exceed our 512-byte boot sector memory limit without optimizations.Adding the
--releaseoption tells Rust to maximize optimizations and minimize binary size when compiling the project. This option is what brings the final stage 1 bootloader to under 512 bytes.❓ 2. Why are all my artifacts now in
release/instead ofdebug/?Compiling your Rust project with
--releaseplaces its artifacts inrelease/instead of the defaultdebug/directory.
You could write a Makefile for this on Unix-based systems, although they aren't trivial to learn/write.
I keep my automated binary generation code in Rust, and make the top-level directory scratch_os/ into its own cargo project. That way, all I have to do is run cargo run from the top-level directory scratch_os/, and the final raw binary is generated and executed on QEMU. This is the primary method I'll be using in this blog!
ℹ️ My source code reference for the above Rust project structure can be found under
scratch_os-blog-src/ch01-03-srcwithin this blog's GitHub Repository.
The start of our bootloader code is going to pretty involved and will require a lot of inline assembly, so I don't think it's smart to jump straight into the code. Instead, I'll spend a lot of this section exploring the hardware environment we are in to motivate what our bootloader code aims to do.
This section is a bit long, so I'll briefly list what I plan on covering:
- Processor registers in 16-bit real mode.
- The program stack and setting the stack pointer in assembly.
- Memory segmentation and zeroing out segment registers in assembly.
- Translating our small assembly work to Rust.
- The machine's BIOS software and using its utility to write a
Hello, World!from our Rust bootloader.
Let's begin:
Processor Registers
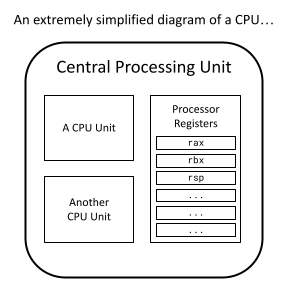
Just like how secondary storage and RAM are types of computer memory, processor registers are another type of memory. They are tiny pieces of storage that lives directly on the CPU. Because they are so close to the CPU, operating with a processor register is by far the fastest out of any memory type. However, registers are extremely small, 8 bytes wide on the x86 architecture, and there aren't many of them to use. In fact, each processor register has its own 2 to 3 letter name like rax, rbx, rsp, etc.
I mentioned in Section 1.1 that x86 machines start in 16-bit real mode (while writing the custom target JSON file). This means that in this 16-bit state, we can only use a quarter of every register.
A typical register is 8 bytes long, so a quarter of it is 2 bytes or 16 bits, hence the name 16-bit real mode.
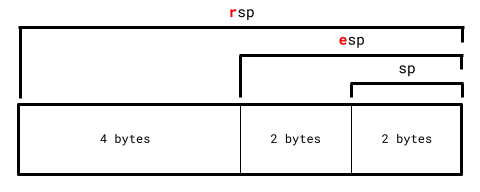
An x86 machine is always in one of three modes:
- 16-bit real mode (the currently active one) where registers don't have any letter prefix.
- 32-bit protected mode where registers are prefixed with the letter
e. - 64-bit long mode where registers are prefixed with the letter
r.
ℹ️ EXAMPLE: Taking the register
rspas an example, we can only refer to it with its first 2 bytes asspfor now since we're in 16-bit long mode. We won't be able to userspand its full 8 bytes until we move to 64-bit long mode.
Additionally, there are 4 important general-purpose registers on the CPU: rax, rbx, rcx, and rdx. In 16-bit mode specifically, these 4 registers can be split up even further.
Take rax as an example: Its 16-bit register ax can further be split into ah and al, where:
ahthe high register (h) is the higher byte ofax.althe low register (l) is the lower byte ofax.
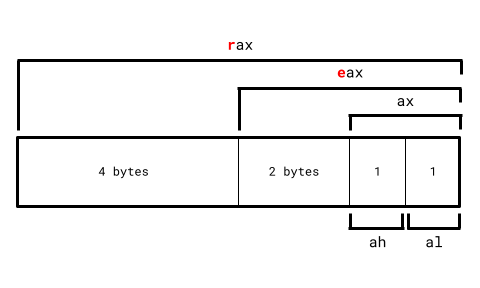
In total:
ah,bh,ch, anddhare the 4 high registers in 16-bit real mode.al,bl,cl, anddlare the 4 low registers in 16-bit real mode.
The Program Stack
A computer program cannot operate without a valid program stack. A program stack is an area of memory in RAM that a program uses to store its local variables and function call information.
Consider this sample Rust program:
fn main()
{
    let res = run_func();
    ...
}

fn run_func() -> i32
{
    let mut a: i32 = 4;
    let mut b: i32 = 10;

    a = a * b;
    b = a * b;
    return a + b;
}
As a machine runs through the program, before it enters run_func, the stack (vastly oversimplified) looks something like:
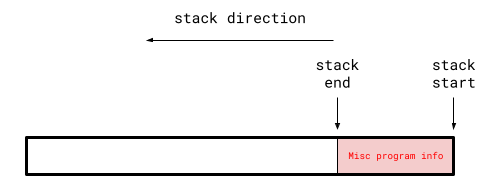
Notice how the stack end appears before the stack start. Program stacks always grow downwards on x86 machines (and in most other architectures).
As the program enters run_func, the program stack adjusts to something like:

The purple box is the stack addition caused by run_func. This addition is called a stack frame and each stack frame corresponds to a function call. If there were another function within run_func, another stack frame would be "pushed" onto the program stack when entering that function call.
More specifically, the program stack is all stack frames representing all active function calls during program execution.
Analyzing run_func's stack frame, we can see it contains space for all its local variables (a and b in this case). Stack frame also contain other information like function parameters and which address to go to once this function is exited.
Once the program returns from run_func, the program stack reverts to:
At this point run_func's information isn't needed anymore, so its stack frame gets "popped" from the program stack.
This program stack mechanism is how a program keeps track of all active function calls, local variables, and parameters as it's being executed.
Setting the Stack Pointer
A program's stack is so important that it has its own processor register for it, rsp ("sp" standing for "stack pointer"). It is responsible in storing the stack end of the currently executing process.
This is relevant to us because an x86 machine on start-up does not set the stack pointer, it's the bootloader's responsibility to first set up its own stack before it does anything else. Virtually all Rust code utilizes the stack pointer, and running Rust code before setting up the stack pointer will cause major problems.
So we need to find some space in RAM that can act as our bootloader's stack. However, we can't just choose a memory space at random as some spots are reserved by the machine's hardware. Our bootloader's code also takes up some space, so we need to make sure our placed stack doesn't interfere/overwrite any of our bootloader code or machine hardware memory.
Let's look at what the first mebibyte (220 bytes) of RAM looks like:
| Start (Exclusive) | End (Inclusive) | Contents | Is Usable? |
|---|---|---|---|
0x0 |
0x500 |
BIOS Data | No |
0x500 |
0x7c00 |
Bootloader Memory | Yes |
0x7c00 |
0x7e00 |
Bootloader's First Sector | |
0x7e00 |
0x80000 |
Bootloader Memory | |
0x80000 |
0x100000 |
Hardware Reserved | No |
It would be smart to leave the space after 0x7e00 for the rest of our bootloader as it gets larger. This leaves us with the usable area from 0x500 to 0x7c00 to act as our bootloader's stack. This area is a bit more than 30,000 bytes large, which will be more than enough for our bootloader's stack.
Setting up the bootloader's stack is nothing more than just setting the stack pointer register sp (16-bit register of rsp) at the start of the bootloader code. Rust's compiler will then do all the work of adjusting the stack pointer as stack frames get added/removed through function calls.
Since the program stack grows downwards, we want to set the stack pointer to the highest memory address of the stack area, 0x7c00 in this case.
Setting the value of registers requires assembly language, which is a programming language low-level enough to be able to interact with registers and its values. The command we're interested in is mov, which has the following syntax:
mov [dst], [src]
...where the register at [dst] is set to the value at [src].
- The
[src]argument could optionally be another register, in which case the contents of the[src]register gets copied into the register at[dst]. - The
[dst]argument must be a register.
If we want to set the stack pointer sp to 0x7c00, this in assembly is:
mov sp, 0x7c00
ℹ️ NOTE: Everything will still be written 100% in Rust. You can write inline assembly in Rust which will be discussed later.
Memory Segmentation in 16-Bit Mode
There are two main types of RAM memory addressing schemes that machines use, paging and segmentation. We'll eventually use paging once we are in 64-bit long mode, but it's important to talk about memory segmentation since this is what's used when the machine first boots.
Memory segmentation in 16-bit real mode partitions the entirety of the machine’s RAM into 16-byte (not -bit) segments.
When memory segmentation is used, referring to a particular memory address in RAM requires two pieces of information...
- Which segment is being referred to. If RAM was an array of segments, which index are you selecting?
- The offset from the selected segment.
The syntax for this memory addressing scheme is [segment]:[offset]. For example, 0x100:0x1000 refers to 0x1000 bytes offsetted from the start of the 0x100th segment (offsets can relocate to other segments).
In general:
\[a = 16s + o\]
...where \(a\) is the absolute memory address, \(s\) is the segment and \(o\) is the offset.
Since we're in 16-bit mode, we can only use 16 bits to refer to any segment and offset. Hence, the maximum memory address we can refer to is
65535:65535(65,535 being the highest representable number with 16 bits), or around 1.06 MB.In other words, 16-bit mode has 1.06 MB of total addressable RAM space. This is extremely low for a legitimate operating system.
64-bit long mode on the other hand can address tens of terabytes of RAM space. This is arguably the biggest reason of wanting to make the switch to 64-bit long mode.
However, you can't use any register to refer to a segment. Segment registers are a class of registers whose sole purpose is to refer to segments for memory access. The registers ds, es, fs, gs, and ss make up this class.
Zeroing the Segment Registers
There are very few guarantees that can be made about your environment at startup. One of which is the value of these segment registers, which could be random at boot time. This means if left untouched, using a segment register may point to a random segment and therefore a random memory address, not good. This is why it is common practice to set all segment registers to zero prior before anything else.
However, we can't do something like:
; WON'T WORK (the semicolon is assembly's comment delimiter)
mov ds, 0
One annoying thing about segment registers is that they can't be set directly. They must be set indirectly through another register. Recall how in the mov command, we can set [src] to a value or a register. For segment registers, the source must be register. I'll use the general purpose register ax for this:
mov ax, 0
mov ds, ax
mov es, ax
mov fs, ax
mov gs, ax
mov ss, ax
Assembly in Rust
To recap, we want to:
- Set the stack pointer to
0x7c00. - Zero out all segment registers.
I mentioned that this entire project would be in Rust, that was not a lie. Rust has the capabilities of writing inline assembly using its \Verb|core::arch::asm| macro.
/* ❗ IMPORTANT:
 * -------------------------------------------------------------
 * This WON'T work right now! A few adjustments need to be made.
 */

#[no_mangle]
fn entry() -> !
{
    unsafe { core::arch::asm!
    (
        "mov sp, 0x7c00",

        "mov ax, 0",
        "mov ds, ax",
        "mov es, ax",
        "mov fs, ax",
        "mov gs, ax",
        "mov ss, ax"
    )}

    loop {}
}
❓ What is
unsafearound the inline assembly?All inline assembly within Rust needs to be put around an
unsafeblock. There's a lot of ways to mess up with assembly and bypass required invariants by the Rust compiler, so theunsafeblock acknowledges that we as programmers are responsible for making sure nothing within the block causes undefined behavior.
As mentioned in the code block's comment, this won't work for a very subtle reason. Recall that every function call get their own stack frame. The entry function's stack frame is created before anything in entry's body is run. Rust's compiler can change the stack pointer and segment registers (and any other register) during this stack frame's creation.
However, we manually change the stack pointer and segment registers within the entry function, invalidating the compiler's assumptions about these register states, hence causing undefined behavior.
ℹ️ Check out this StackOverflow that goes over this exact issue more in-depth: https://stackoverflow.com/questions/78709286/how-to-prepare-stack-pointer-for-bare-metal-rust/
Quoting one of the StackOverflow post solutions: "The way to do this would be to make entry a naked function (with the #[naked] annotation), for which the compiler will not generate any additional assembly code beyond exactly what you specify."
This includes compiler code generation for function stack frames. The downside is that you can only write inline assembly with naked functions since fundamental Rust essentials like local variables and returning from functions aren't possible without a stack frame.
// entire `main.rs` file

#![no_std]
#![no_main]
#![feature(naked_functions)]

#[naked]
#[no_mangle]
extern "C" fn entry() -> !
{
    unsafe { core::arch::asm!
    (
        "mov sp, 0x7c00",

        "mov ax, 0",
        "mov ds, ax",
        "mov es, ax",
        "mov fs, ax",
        "mov gs, ax",
        "mov ss, ax",

        "hlt",

        options(noreturn)
    )}
}

#[panic_handler]
fn panic(_: &core::panic::PanicInfo) -> !
{
    loop {}
}
4 additions have been made:
-
Naked functions in Rust are still an unstable feature, which is why we explicitly write
#![feature(naked_functions)]to use it. -
The
#[naked]attribute makesentrya naked function. Rust functions are currently unsupported for naked functions, soextern "C"specifies to use the C's language ABI instead, which is supported in naked functions. -
The
hltinstruction stops the CPU from executing any further instruction until an interrupt is encountered. Interrupts are disabled at boot-time, so this is essentially an infinite loop. -
Inline assembly blocks allow you to specify options to modify the assembly block's properties. The
noreturnoption is required in naked functions. Returning from functions requires information from a stack frame, which naked functions can't generate.
Although we could theoretically write our entire bootloader with inline assembly, it misses the essense of a "Rust" project. We should only use naked functions and unsafe blocks in general only when absolutely necessary, so let's find a way to write the rest of our code in Rust after our naked inline assembly setup.
Say we have a Rust function stage_1_main, we can't simply make a call like:
#[naked]
#[no_mangle]
extern "C" fn entry() -> !
{
    unsafe { core::arch::asm!
    (
        "...", // assembly routine
        options(noreturn)
    )}

    stage_1_main()
}

fn stage_1_main() -> !
{
    loop {}
}
...since only inline assembly code is allowed inside naked functions. Thankfully, assembly has the call command to invoke a function:
call [fn]
...where [fn] is the function label. However, the inline assembly might not be able to find the function symbol if the compiler mangles it. Thankfully, Rust's inline assembly allows us to circumvent this:
#[naked]
#[no_mangle]
extern "C" fn entry() -> !
{
    unsafe { core::arch::asm!
    (
        "mov sp, 0x7c00",

        "mov ax, 0",
        "mov ds, ax",
        "mov es, ax",
        "mov fs, ax",
        "mov gs, ax",
        "mov ss, ax",

        "call {main}",

        main = sym stage_1_main,
        options(noreturn)
    )}
}

fn stage_1_main() -> !
{
    loop {}
}
Tokens within inline assembly strings enclosed within curly braces introduces a new template string (main in this case). These templates must refer to either a register, variable, or a function. In this case we use the sym keyword to have the main template refer to the stage_1_main function with its mangled or unmangled symbol name (handled by the compiler 😄).
Now, call {main} effectively invokes stage_1_main as intended, and we can write all the Rust code we want within stage_1_main!
The Basic Input Output System
The Basic Input Output System, or BIOS, is a piece of software that provides a lot of utility for us to nagivate the machine's unweildy and OS-free environment.
Our bootloader is not the first program that is run on boot-time. This actually belongs to the BIOS. Once the BIOS is initialized, it is actually the piece of software responsible for reading the first sector of a bootable storage device and loading its first sector specifically at 0x7c00.
Along with loading the boot sector, it provides lots of utility through the use of interrupts. Interrupts can be raised manually as a code instruction or through some external event like a keyboard click, and they temporarily pause code execution to run the interrupt handler corresponding to the raised interrupt.
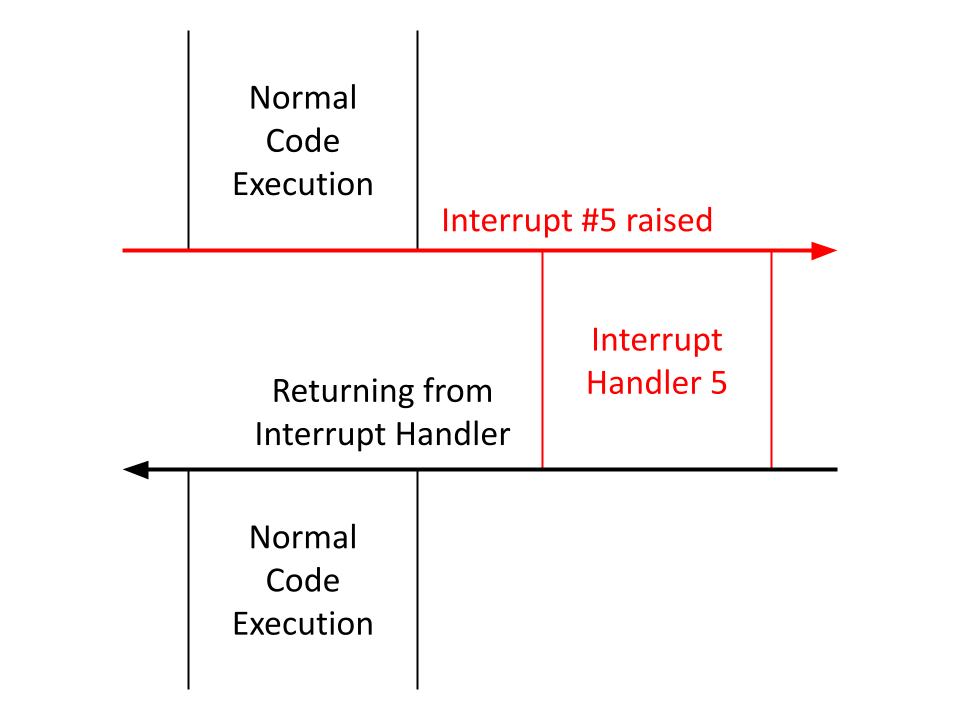
Raising an interrupt manually as a code instruction is simple. Say I wanted to raise interrupt 99, the assembly code would look like:
int 99
BIOS sets up a few interrupt handlers in 16-bit mode. The one we want to use for building a Hello, World! is BIOS's 16th interrupt handler, which can print one character to the screen. So to invoke this handler we raise interrupt 16. However, we haven't specified which character we want to print.
The BIOS software expects us to provide interrupt-specific information/parameters in specific registers before that interrupt is raised.
Printing a character with BIOS's 16th interrupt handler requires the following register parameters.
| Register | Expected Value |
|---|---|
ah | The Subservice ID |
al | The ASCII Representation of the Character to Print |
BIOS's interrupt 16 actually provides many services relating to hardware display and graphics. Subservice 14 is specifically responsible for printing a single character to the screen.
ℹ️ NOTE: The ASCII Table is a specification that maps common characters to numbers 0-255. The official mapping can be found at https://www.ascii-code.com.
As an example, say we want to print the character a whose ASCII mapping is 97, the assembly would look like:
mov ah, 14      ; print character subservice
mov al, 97      ; `a` ascii value
int 16          ; invoke BIOS handler after register parameters are set
A Bootloader Hello, World!
When interpreting this BIOS assembly routine to Rust, we need to be careful about preserving register states. Our routine manually changes ah and al, and it's very possible that the Rust compiler will misuse these registers outside this BIOS routine due to not accounting for our changes made on these registers.
unsafe { core::arch::asm!
(
    "...", // assembly routine
    out("ah") _,
    out("al") _
)}
These out commands mark ah and al as clobbered, telling the compiler to revert ah and al to their previous values that the compiler is aware of.
ℹ️ CLARIFICATION:
Changes made to the stack pointer
spand segment registers are meant to persist beyond its function scope. Marking them as clobbered would revert all these registers to undefined values.However, the
ahandalregisters within the BIOS routine were only meant as intermediate "interrupt parameters", and we don't want to persist these changes outside the routine, which is why we clobber them.Technically,
axwithin the naked function was used as an intermediate to zero all segment registers. A few remarks:
Since naked functions don't generate assembly beyond exactly what we specify, the compiler won't make any assumptions on register values that we need to maintain.
In other words, preserving register values is only necessary in non-naked functions, where compiler-inserted function prologue/epilogue instructions require register assumptions to be consistent across the function's body.
Remember, the
outcommand reverts register values after the assembly block is executed. But since we marked the nakedentryassembly routine withoptions(noreturn), this assembly routine won't ever terminate (it callsstage_1_main, which itself never returns) and attempting to add anyoutcommands toentry's assembly block will actually fail at compile time.This means we wouldn't be able to clobber
sp, the segment registers, andaxanyways even if we wanted to.
Opposite to the out command, Rust's inline assembly in command sets a particular register's value before the assembly block is executed.
With this, we can write our BIOS assembly routine in Rust:
unsafe { core::arch::asm!
(
    "int 16",
    in("ah") 14u8,
    in("al") 97u8,
    out("ah") _,
    out("al") _
)}
A few notes:
-
We set the
ahandal"interrupt parameter" registers before invokingint 16through Rust'sincommand. These register states are then preserved with theoutcommand. -
Normally, integer literals like
14and97are of typei32(32-bit wide integers) by default, but these aren't compatible with the 8-bit wideahandalregisters, which would fail at compile time.The
u8type represents an 8-bit wide unsigned integer (or non-negative integers). This fits better in our case since BIOS subservice IDs and ASCII values will never be negative. Register values in general are always set to nonnegative integer values.We specify
u8representations of 14 and 97 rather than thei32default by writing14u8and97u8.
If you use the in and out command on the same register, you can combine them with the inout command. The above assembly routine can be simplified to:
unsafe { core::arch::asm!
(
    "int 16",
    inout("ah") 14u8 => _,
    inout("al") 97u8 => _
)}
This assembly routine will properly print the lowercase character a while preserving all register states! Let's generalize this into a utility function to print any character:
fn btl_print_char(char_to_print: u8)
{
    unsafe { core::arch::asm!
    (
        "int 16",
        inout("ah") 14u8 => _,
        inout("al") char_to_print => _
    )}
}
This is ideal since all possible u8 values range from 0-255, all of which has a mapping to some character in ASCII. In other words, it's not possible to input a u8 that goes out-of-bounds from the ASCII table.
We can use this to write a generic print function using BIOS:
fn btl_print(str_to_print: &[u8])
{
    for &c in str_to_print
    {
        btl_print_char(c);
    }
}
Let's test this and write a Hello, World! within stage_1_main:
fn stage_1_main() -> !
{
    btl_print(b"Hello, World!");
    loop {}
}
The literal b"Hello, World!" (or the byte representation of Hello, World!) is a Rust language feature that converts the string Hello, World! into a slice of ASCII representations of its characters, perfect for our use case.
Running it on the QEMU emulator:
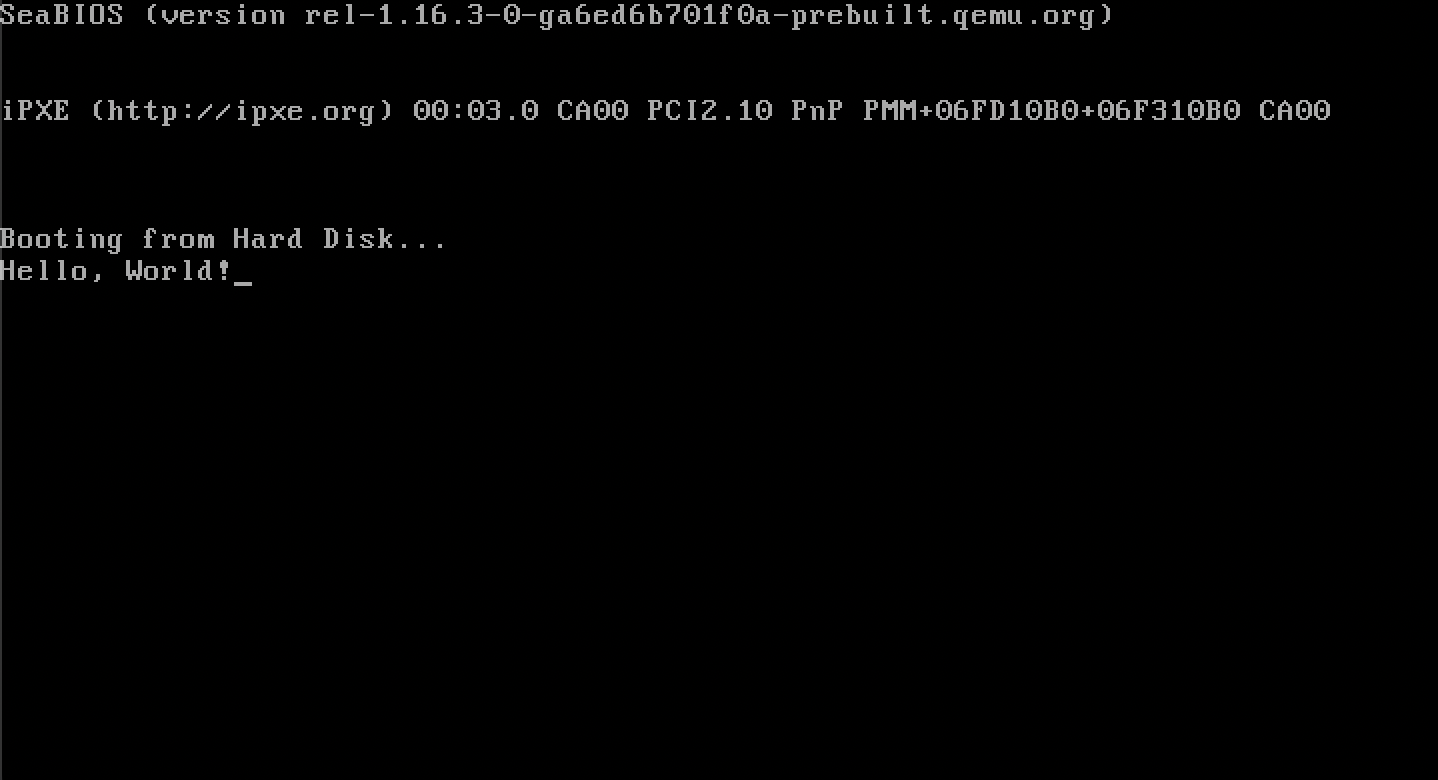
Swag.
A More Efficient loop {}
loop {} is what is called a busy wait, where the CPU burns all of its energy and resources running the infinite looping instruction.
Looking at your machine's Task Manager/Activity Monitor, you can see the bootloader takes up a lot of energy:

100% CPU usage is a horror 😔
Let's make this more efficient. As mentioned before, the hlt instruction stops the CPU completely until an interrupt is encountered (where code execution will continue past hlt).
Although interrupts are disabled at boot time, let's be safe and disable interrupts ourselves to protect against executing past the hlt instruction.
Thankfully, the cli instruction specifically disables interrupts:
fn inf_loop() -> !
{
    unsafe { core::arch::asm!
    (
        "cli",
        "hlt",
        options(noreturn)
    )}
}
Updating stage_1_main:
fn stage_1_main() -> !
{
    btl_print(b"Hello, World!");
    inf_loop()
}
Let's see how much CPU power this saved:

Huge. In the next section, we'll finish the stage 1 bootloader by using BIOS utilities again to acquire more space beyond the 512-byte long boot sector.
Escaping the Boot Sector
Right now, our entire hard disk just consists of one sector that's loaded into 0x7c00 in RAM for us. However, our bootloader will inevitably grow larger than 512 bytes.
The vision is to place the rest of the bootloader directly after the first sector:

ℹ️ Disk Image Format Clarification:
This format will change once we start implementing a filesystem, which is nothing but a disk image format specification that makes it a lot easier to program concepts like files and directories into our operating system. Since these concepts aren't relevant right now, I'm keeping this disk image format purely for the sake of simplicity.
Know that this isn't how typical operating systems format their disk image and that it will be changed once we get into filesystems.
Remember that memory in the hard disk (or any secondary storage) is not directly usable by the CPU and will first need to be copied into RAM (or any primary storage) to be operable. Also remember that only the first sector from the hard disk is brought into RAM for us, so we'll need to bring the rest of the sectors into RAM ourselves if we want the rest of the bootloader to be at all useful.
It's smart to dedicate the first sector to bring in the rest of the sectors to RAM: there isn't much else we can do within 512 bytes anyways.
We'll need to decide where exactly to place the rest of the bootloader in RAM. Revisiting what the machine's RAM looks like at start-up, there exists usable memory around where the first sector is loaded at 0x7c00:
- In the last section we placed the bootloader stack before the first sector.
- I plan to place the rest of the bootloader directly after the first sector, at
0x7e00.
| Start (Exclusive) | End (Inclusive) | Contents | Is Usable? |
|---|---|---|---|
0x0 |
0x500 |
BIOS Data | No |
0x500 |
0x7c00 |
Bootloader Stack | Yes |
0x7c00 |
0x7e00 |
Bootloader's First Sector | |
0x7e00 |
0x80000 |
Rest of Bootloader | |
0x80000 |
0x100000 |
Hardware Reserved | No |
Let's begin by reading in the rest of the bootloader into 0x7e00 in RAM from the first sector:
Disk Reading Roadmap
Thankfully, BIOS provides a utility that loads in any specified sector into any specified location in RAM, exactly what we want. Unluckily, this utility is part of BIOS extensions that aren't supported on some extremely old BIOS software. However, BIOS also provides an "extension check" utility to see if extensions can be used on the machine's particular BIOS.
As responsible programmers, we'll be using this "extension check" utility so we can display a nice Unsupported BIOS error message instead of undefined behavior if it doesn't pass the check.
This "extension check" BIOS utility specifically is Interrupt 19 Subservice 65. Just like with BIOS's utility for printing characters, we need to specify some register value "parameters" before we invoke this interrupt.
| Register | Expected Value |
|---|---|
ah | The Subservice ID - 65 in this case |
bx | Must be 0x55aa |
dl | The Disk Drive Number |
All these parameters are self-explanatory, besides the disk drive number:
An x86 machine has multiple secondary storage devices (including the hard disk), each with their own unique disk drive number. BIOS wants to know which exact secondary storage device it needs to operate with through its disk drive number.
So we need to find a way to extract the hard disk's disk drive number.
Despite knowing very little about the state of hardware environment at start-up, there's a few guarantees you can rely on:
- You can always rely on the hard disk's first sector to be loaded into
0x7c00in RAM and executed. - You can also always rely on the register
dlto contain the hard disk's disk drive number at start-up.
There's a few layers of indirection, but I'll recap for clarity:
- We'll extract the hard disk's disk drive number from
dlat start-up. - We'll then pass the disk drive number into BIOS's "extension check" utility.
- Once BIOS extensions are confirmed, we'll finally use the desired BIOS utility to read sectors into RAM.
Retrieving Disk Drive Number
Extracting the disk drive number from the non-naked stage_1_main function is difficult since compiler-inserted function prologues can change any register value. We can't trust dl to have the disk drive number in stage_1_main.
The only other option is to extract dl's value from the naked entry function. We need to find someway to transfer dl's value from entry (where only assembly can be written) to non-naked stage_1_main.
There's two ways to send information to functions externally:
- Global variables. These will require
unsafeblocks since we don't have any thread-safe mechanisms yet. - Parameters. This is the preferred option.
fn stage_1_main(disk_drive: u8) -> ! { ... }
We must somehow find a way to pass in a u8 parameter to stage_1_main using only assembly in the naked entry function.
Calling Conventions
In assembly, parameters can be passed any way you like, as long as the function invoker (caller) and the function itself (callee) agrees on how it's done.
Different programming languages have standardizations (as part of their calling convention) on how parameters are passed to functions for specific architectures. This process is similar to passing register parameters before invoking BIOS interrupts.
For example using C on the x86_64 architecture, the first parameter is always passed through the register
rdi, the second inrsi, third inrdx, etc. Say the following function exists on the x86_64 architecture:/* C syntax */ void x86_64_func(long param_1, long param_2, long param_3);...and we perform the following call:
x86_64_func(10, 64, 999);This call in assembly would look roughly like:
mov rdi, 10
mov rsi, 64
mov rdx, 999
call x86_64_func
...where parameters are set in the calling convention's standardized registers before invoking the function call. Now if
param_1is ever used withinx86_64_func's function body, C's compiler will know to find it in therdiregister.
x86 in 16-bit mode falls under the x86_32 architecture (which captures both 16-bit and 32-bit modes of x86). C also has a calling convention for this architecture, where function parameters are pushed onto the program stack before the function call.
Take the sample x86 16-bit (x86_32 architecture) function...
/* C syntax */
void x86_32_func(int param_1);
...and let's call it:
x86_32_func(111);
Within the function itself (from the callee's perspective), it expects the program stack to be set up like:
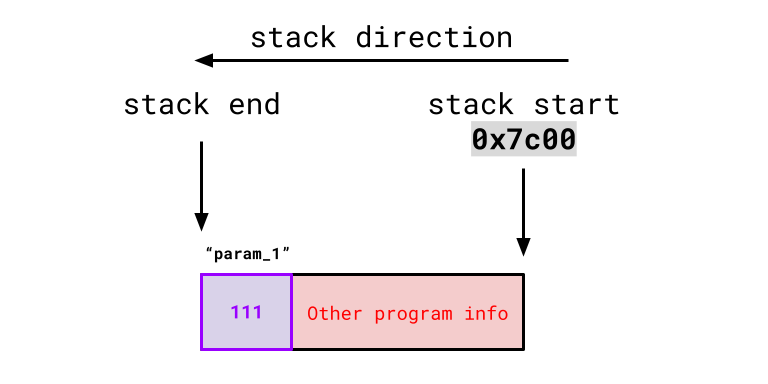
...so any time it uses param_1 in its function body, it will look at the end of the stack for it.
So it's our responsibility from the caller's perspective to push or "append" the first parameter onto the stack so that the callee is in agreement that the first parameter is at the end of the stack.
Thankfully, there's an assembly command that does just this:
push [src]
...where [src] is a register, and its value gets copied and pasted to the end of stack for us (accounting for stack direction).
In C's x86_32 calling convention, it expects parameters to be pushed onto the stack in 32-bit increments. This is a problem in our case since we only want to pass in dl, an 8-bit wide register. However, you can still get around this.
If you want to pass an 8-bit parameter in C's x86_32 calling convention, you place the 8 bits at the lower quadrant of a 32-bit register and push that register on the stack. If the function callee itself knows it's being passed an 8-bit parameter, it will only use the lowest 8-bits of the 32-bit value at the end of the stack (ignoring the upper 24 bits).
Thankfully, dl is already the 8-bit lower quadrant of the 32-bit wide register edx (we discuss register anatomy here), so we can simply push edx onto the stack and only its lower 8-bits (a.k.a. dl) will be used.
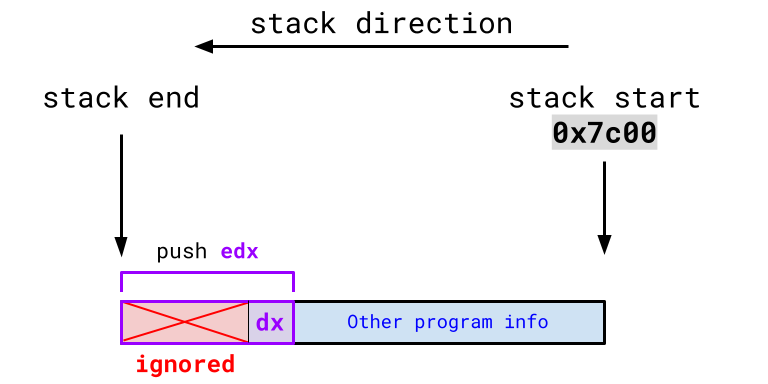
In conclusion, this is just a one-liner assembly command: pushing edx onto the stack before calling stage_1_main.
#[naked]
#[no_mangle]
extern "C" fn entry() -> !
{
    unsafe { core::arch::asm!
    (
        "mov sp, 0x7c00",

        "mov ax, 0",
        "mov ds, ax",
        "mov es, ax",
        "mov fs, ax",
        "mov gs, ax",
        "mov ss, ax",

        "push edx",
        "call {main}",

        main = sym stage_1_main,
        options(noreturn)
    )}
}

/* Doesn't quite use the correct calling convention just yet */
fn stage_1_main(disk_drive: u8) -> !
{
    inf_loop()
}
We've done everything "caller" side. Now let's resolve the "callee" side (which thankfully isn't nearly as difficult).
There's nothing specifying which calling convention stage_1_main should use. Rust functions have no standardized calling convention, but we can override this and specify a calling convention that stage_1_main must adhere to:
We can look at all calling conventions Rust supports through its official ABI string reference: https://doc.rust-lang.org/reference/items/external-blocks.html#abi.
We can see that
extern "cdecl"represents C's x86_32 calling convention.
Updating stage_1_main,
extern "cdecl" fn stage_1_main(disk_drive: u8) -> !
{
    inf_loop()
}
The assembly "caller" code and the "callee" stage_1_main function agree to use C's x86_32 calling convention, where the disk_drive parameter is found in the last 8-bits of the 32-bit value at the end of the program stack.
Great! Let's test it: the hard disk's disk drive number on QEMU is always 0x80.
/* ❗ QEMU Only Code!
 * ------------------------------------------------------------------------------
 * The hard disk's disk drive number may not be 0x80 on other emulators/machines:
 */
extern "cdecl" fn stage_1_main(disk_drive: u8) -> !
{
    if disk_drive == 0x80
    {
        btl_print(b"Success!");
    }

    inf_loop()
}
Running it on QEMU:
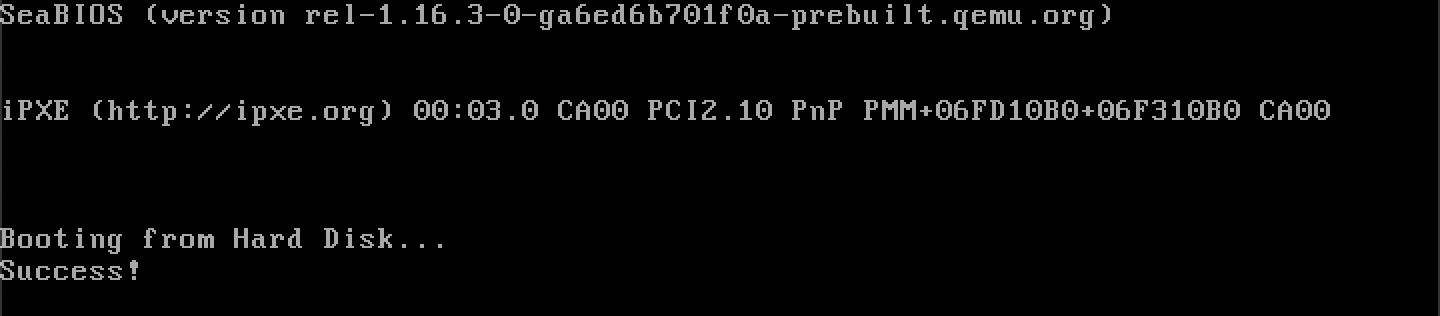
We successfully took in the disk drive number as a parameter in assembly.
Checking for BIOS Interrupt 19 Extensions
Now, we have everything required for BIOS's interrupt 19 extension check. As a reminder, it takes in the following register parameters:
| Register | Expected Value |
|---|---|
ah | The Subservice ID - 65 |
bx | Must be 0x55aa |
dl | The Disk Drive Number |
In Rust:
extern "cdecl" fn stage_1_main(disk_drive: u8) -> !
{
    unsafe { core::arch::asm!
    (
        "int 19",
        inout("ah") 65u8 => _,
        inout("bx") 0xaa55u16 => _,
        inout("dl") disk_drive => _
    )}

    inf_loop()
}
Furthermore, this interrupt will set the carry flag if extensions are not supported.
❓ What is the carry flag?
The carry flag is one of 32 flags stored in the status register, a special 32-bit wide register where each bit represents a particular boolean flag (0 or 1) that aids in various computer operations.
To extract the value of the carry flag, we can use the sbb (subtract with borrow) assembly command:
sbb [dst], [src]
This effectively does [dst] = [dst] - [src] - carry flag. There's a neat trick we can use if we set [dst] and [src] to the same register, something like:
sbb cx, cx
Then, cx will be 0 if the carry flag isn't set, and -1 if it is set. Rust's inline assembly allows us to extract the value of registers into local variables:
/* Sample Rust code to extract whether or not the carry flag is set
 * ----------------------------------------------------------------
 */
let sbb_carry_flag_value: i16;
unsafe { core::arch::asm!
(
    "sbb cx, cx"
    out("cx") sbb_carry_flag_value
)}

if sbb_carry_flag_value != 0
{
    // carry flag is set
}
Before, we've only seen the out command used with just an underscore _ which restores the register's previous state. Supplying a variable will additionally store the register's final value (before the revert) to the variable.
Combining this with the BIOS interrupt call, we have:
let sbb_carry_flag_value: i16;
unsafe { core::arch::asm!
(
    "int 19",
    "sbb cx, cx",
    inout("ah") 65u8 => _,
    inout("bx") 0xaa55u16 => _,
    inout("dl") disk_drive => _,
    out("cx") sbb_carry_flag_value
)}

if sbb_carry_flag_value != 0
{
    btl_print(b"BIOS Ext Not Supported!");
    inf_loop();
}
I chose to use
cx, but any register works. You can optionally have the compiler select an intermediate register for you:let sbb_carry_flag_value: i16; unsafe { core::arch::asm! ( "int 19", "sbb {sbb_reg:x}, {sbb_reg:x}", sbb_reg = out(reg) sbb_carry_flag_value inout("ah") 65u8 => _, inout("bx") 0xaa55u16 => _, inout("dl") disk_drive => _ )}Previously, we've only seen the
inandoutcommand used with explicit registers.regis one of the many register class in which the compiler gets to choose any register from that class (rather than us supplying an explicit register).You can find information on register classes in The Rust Reference: https://doc.rust-lang.org/reference/inline-assembly.html#register-operands
sbb_regis a template string, just likemainin the nakedentryfunction (you can name these whatever you want). In this case, we tell the compiler to replace thesbb_regtemplate string with a register of its choice from theregregister class.❓ What is the
:xin front of{sbb_reg}?When the compiler gets to choose a register, it will choose a 32-bit wide register by default. Notice how this register outputs to a variable of type
i16or 16-bits wide: this is incompatible!Adding an
:xin front of{sbb_reg}tells the compiler to format its selected register as its 16-bit alias.For example, if it selected the register
ecx(32 bits wide), adding:xwould tell the compiler to format the register as its 16-bit aliascxinstead, which is compatible with the 16-bit wide output variable.
If extensions aren't supported, we can stop the program here with an inf_loop since it's required to make further progress.
Setting Up a Disk Address Packet Structure
Now, we can continue with the main BIOS utility that reads sectors to RAM. This utility is Subservice 66 of Interrupt 19 and takes in the following register parameters:
| Register | Expected Value |
|---|---|
ah | The Subservice ID - 66 |
dl | The Disk Drive Number |
si | Address of Disk Address Packet |
siis a 16-bit wide register generally used to store memory addresses.
Additionally, BIOS will populate the ah register with a return code, where 0 represents a successful load and anything else is an error code.
The disk address packet is a structure that contains all information BIOS needs for this interrupt. It's formatted as follows:
| Size | Description |
|---|---|
u8 | Disk Address Packet Structure Size - 16 in this case |
u8 | Always 0 |
u16 | Number of sectors to transfer |
u32 | Where to place in RAM? |
u64 | Which sector index to start reading from? |
Let's write this in Rust:
#[repr(C, packed)]
struct DiskAddressPacket
{
   dap_size:                u8,
   always_zero:             u8,
   sectors_to_transfer:     u16,
   ram_start:               u32,
   sector_start:            u64
}
❓ What is
#[repr(C, packed)]?The
reprattribute changes the memory layout of Ruststructs.By default, the compiler can order
structfields in any way including orders different from the one specified in thestructdeclaration. Additionally, Rust's compiler may add any amount of padding/space betweenstructfields to optimize their memory accesses.However, BIOS expects disk address packets to be layed out exactly in the order specified and with no padding between fields.
#[repr(C)]forces a Ruststructto follow how C handles itsstructs, where fields are placed exactly in the order specified.#[repr(packed)]guarantees no padding/space insertions betweenstructfields.We can combine these 2
reprs with#[repr(C, packed)].
Since the first 2 fields of DiskAddressPacket will always be the same, let's write a constructor that takes in only the last 3 fields as parameters:
impl DiskAddressPacket
{
    fn new(sectors_to_transfer: u16, ram_start: u32, sector_start: u64) -> Self
    {
        return Self
        {
            dap_size:               core::mem::size_of::<Self>() as u8,
            always_zero:            0,
            sectors_to_transfer:    sectors_to_transfer,
            ram_start:              ram_start,
            sector_start:           sector_start
        };
    }
}
DiskAddressPackettakes up 16 bytes of space, so you can just set thedap_sizefield to16, but I like to be more verbose and use Rust'ssize_offunction from its Core Library.
Let's take a look at each of these parameters:
-
sectors_to_transfer: This will depend on how large the rest of our bootloader is. To clarify, this interrupt will only load the 2nd bootloader stage for now.Similar to how stage 1's
.magic_numberlink section prevents it from ever exceeding 512 bytes in size, we can make memory constraints for the 2nd and 3rd bootloader stages. In this blog, my plan is...| Bootloader Stage | RAM Start | RAM End | | :--------------: | :-------: | :-------: | | 2nd Stage |
0x7e00|0x9000| | 3rd Stage |0x9000|0x10000|This will make the stage 2 bootloader 4608 bytes or 9 sectors large.
-
ram_start: We want to load the rest of the bootloader to0x7e00. -
sector_start: Thinking of the hard disk as an array of sectors, index 1 is where the 2nd bootloader stage begins.
Let's construct a DiskAddressPacket on the stack:
const STAGE_2_START: u16 = 0x7e00;
const STAGE_2_END: u16 = 0x9000;
const SECTOR_LENGTH: u16 = 512;
let dap = DiskAddressPacket::new((STAGE_2_END - STAGE_2_START) / SECTOR_LENGTH, STAGE_2_START as u32, 1);
💡 Try defining your numbers as much as possible, raw numbers are unreadable!
Now, we have everything we need to invoke the interrupt:
let load_return_code: u8;
unsafe { core::arch::asm!
(
    "int 19",
    inout("ah") 66u8 => load_return_code,
    inout("dl") disk_drive => _,
    inout("si") &dap as *const _ as u16 => _
)}

if load_return_code != 0
{
    btl_print(b"Rest of Btl Load Failed");
    inf_loop();
}
&dap as *const _ as u16 is how you can get the address of the stack-allocated disk address packet as a u16. Running this code, we see:

Tragic. But, we are allowed to set si manually within the assembly routine. We just need to be extra careful to preserve its state for LLVM, and we can do so through the program stack.
As seen before, the push assembly command adds bytes to the end of the stack, there also exists the inverse pop command which removes bytes from the stack:
pop [dst]
[dst] is a register where the removed bytes will be stored.
Using push and pop in conjunction, we can preserve the state of si:
- Before
siis edited,pushthe old value ofsionto the stack. - Make any necessary edits to
si. popthe old value back into the register.

In Rust:
let load_return_code: u8;
unsafe { core::arch::asm!
(
    "push si",
    "mov si, {addr:x}",
    "int 19",
    "pop si",
    addr = inout(reg) &dap as *const _ as u16 => _,
    inout("ah") 66u8 => load_return_code,
    inout("dl") disk_drive => _
)}
We preserve the contents of si, and set its value via. an intermediate compiler-selected 16-bit wide register before the interrupt.
Jumping to 0x7e00 in RAM
Hypothetically, the 2nd bootloader stage (which doesn't exist yet) is now loaded at 0x7e00. Let's jump to it using the help of our linker script:
ENTRY(entry)

SECTIONS
{
    ...

    . = 0x7c00 + 510;
    .magic_number :
    {
        SHORT(0xaa55)
    }

    stage_2_main = .;
}
Recall that the . character is the linker script's location counter. It is set to 0x7c00 + 510. Since the .magic_number link section is 2 bytes wide, the location counter is then updated to 0x7c00 + 510 + 2 = 0x7e00. We then place a new "label" stage_2_main to the location counter at 0x7e00.
Essentially we make a "promise" to Rust's linker, telling it that a function exists at 0x7e00.
We can extract/import this "promised" function Rust-side by using an extern block at the top of the bootloader code:
#![no_std]
#![no_main]
#![feature(naked_functions)]

extern "Rust"
{
    fn stage_2_main() -> !;
}

...
This makes the compiler look for a label named stage_2_main in the linker script. Since it's defined at 0x7e00, Rust's compiler will interpret stage_2_main as a Rust non-returning function (from the extern block) at 0x7e00 (from the linker script).
The
externblock by default assumes the use of C's calling convention which is whyextern "Rust"is specified so thatstage_2_mainis treated as a Rust function rather than a C function.
Then, we can simply invoke a call to this "promised" function, replacing the infinite loop:
extern "cdecl" fn stage_1_main(disk_drive: u8) -> !
{
    ...

    unsafe { stage_2_main() }
}
The compiler blindly follows our promise of a function at 0x7e00 regardless of if a function is actually there or not, hence the unsafe block.
Creating the Stage 2 Bootloader
This is where we fulfill our end of the promise.
Let's copy and paste the stage_1 Rust project and rename it to stage_2:
scratch_os
├── bootloader
│   ├── stage_1
│   │   └── ...
│   └── stage_2
│       └── ...
└── kernel
There's only a few changes to be made. Beginning with the Cargo.toml file:
- This doesn't change anything, but I'd change the package name to
stage_2instead of the oldstage_1.
Let's change the linker script:
-
We'll keep the function naming consistent and name stage 2's entry function to
stage_2_main:ENTRY(stage_2_main) -
We want
stage_2_mainto be placed at0x7e00, so we'll initially set the location counter to0x7e00:. = 0x7e00; -
For the actual function placement, we'll place
stage_2_mainto be generated first within the.textsection:.text : { *(.text.stage_2_main) *(.text .text.*) } -
Since the
0xaa55magic number is only relevant to the first sector, we can get rid of the.magic_numberlink section. -
We also want to make sure
stage_2is extended to0x9000. Our BIOS interrupt may fail if we request more sectors to load than what exists on the hard disk. We can do this by simply adding some null bytes at0x9000, similar tostage_1's.magic_numberlink section:. = 0x9000 - 2; .stage_2_end_bytes : { SHORT(0x0000) }
Recall that the SHORT keyword inserts 2 bytes, extending stage_2 to end exactly at 0x9000.
At this point, the stage 2 bootloader's linker script is condensed to:
ENTRY(stage_2_main)
SECTIONS
{
. = 0x7e00;
.text :
{
    *(.text.stage_2_main)
    *(.text .text.*)
}
. = 0x9000 - 2;
.stage_2_end_bytes :
{
    SHORT(0x0000)
}
}
We then define stage_2_main in main.rs:
#![no_std]
#![no_main]

#[no_mangle]
fn stage_2_main() -> !
{
    btl_print(b"Hello from stage 2!");
    inf_loop()
}

/* ❗ Don't forget your panic handler!
 * -----------------------------------
 */
#[panic_handler]
fn panic(_: &core::panic::PanicInfo) -> !
{
    loop {}
}
⚠️
btl_printandinf_loopare defined twice instage_1andstage_2!Code duplication should be avoided as much as possible. I create a
commonRust library crate that contains any code used in multiple components of this project (bootloader stages or the kernel).I implement and document this
commonlibrary crate underscratch_os-blog-src/ch01-04-srcwithin this blog's GitHub Repository, I recommend following this approach.
- You can create a new library crate with the terminal command:
cargo new <crate_name> --lib
- You allow binary crates (like the
stage_1andstage_2crates) to use library code by adding the library as a dependency in the binary crate'sCargo.tomlfile.
Now, we need to convert this new stage_2 project into a raw binary. This process is identical to stage_1.
In a shell script:
cd bootloader/stage_2/
cargo build --release
cd target/<name_of_your_json_file>/release/
objcopy -I elf32-i386 -O binary stage_2 stage_2.bin
...or equivalent Rust code if you use Rust for your automatic runner.
Finishing the Disk Image
We now have two raw binary files: stage_1.bin and stage_2.bin.
stage_1.binrepresents the disk image's first sector.stage_2.binrepresents the "rest of the bootloader".
It's time to merge these into one final disk image to run on QEMU. Let's first start by creating an empty file named disk_image.iso.
If your runner code is in Rust:
// Creates an empty `disk_image.iso` file
let mut disk_image_iso = std::fs::OpenOptions::new()
    .read(true)
    .write(true)
    .create(true)
    .truncate(true)
    .open("<path to your disk image>/disk_image.iso")
    .expect("Could not open the disk image!");
❓ What is the
.isoformat?The
.isoformat is typically used for files meant to represent entire secondary storage devices. In our case,disk_image.isorepresents the machine's hard disk.
This is how I envision the disk image to be created:
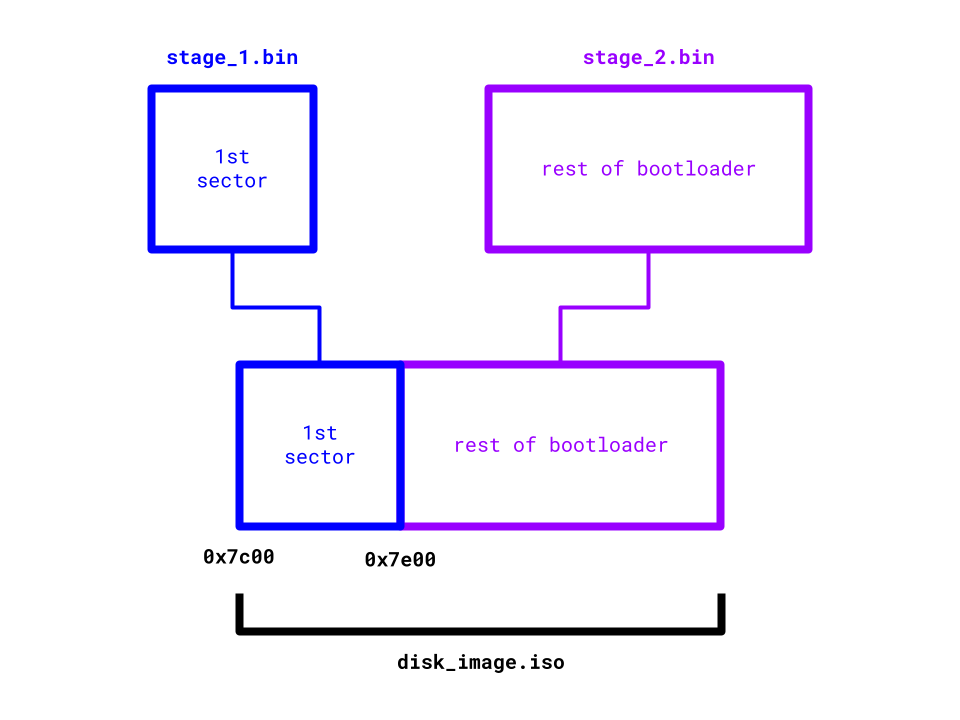
There's a lot of moving parts here:
- At the very start, BIOS will load the first sector (
stage_1), to0x7c00in RAM. At this point, onlystage_1exists in RAM, andstage_2will still be on the disk.
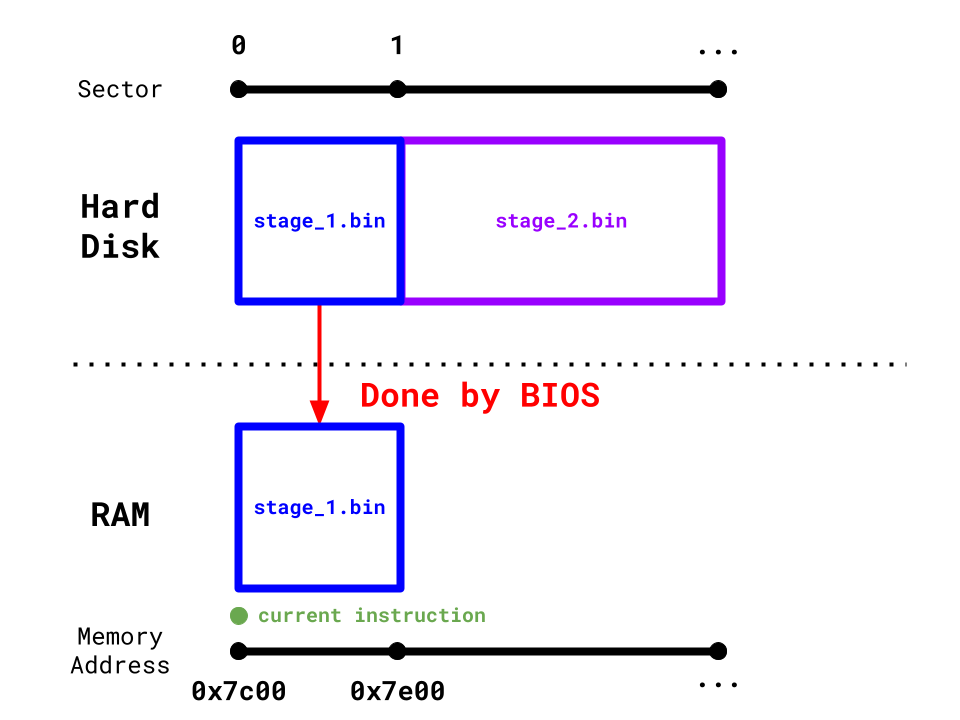
- The code within
stage_1is then responsible for loadingstage_2into RAM at0x7e00.
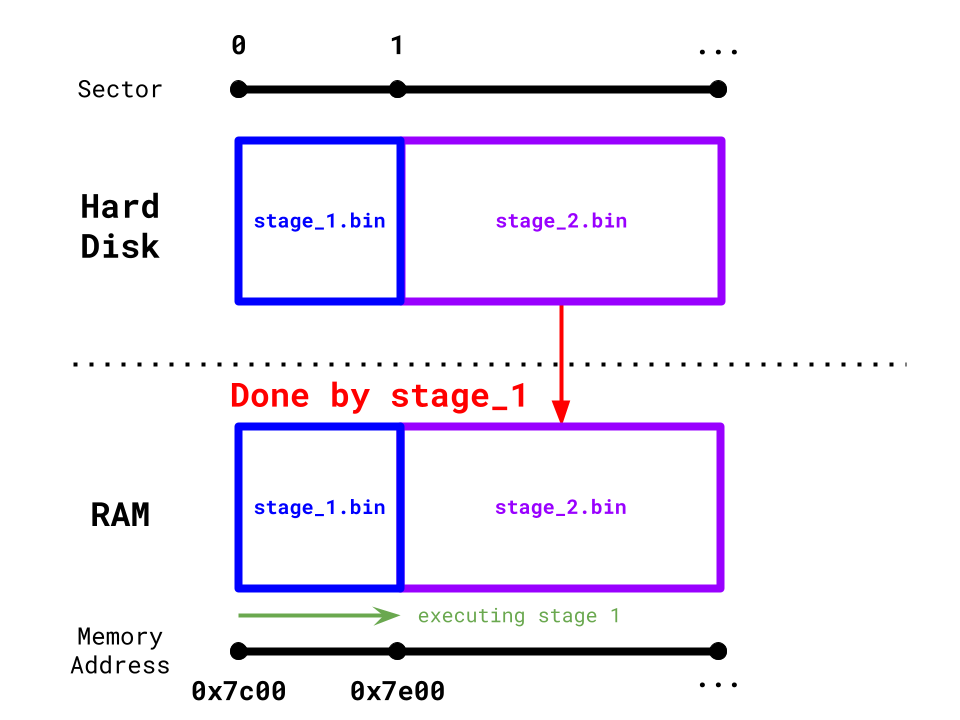
stage_1then jumps to0x7e00, wherestage_2places itsstage_2_mainfunction. Code execution successfully continues instage_2_main(theoretically).
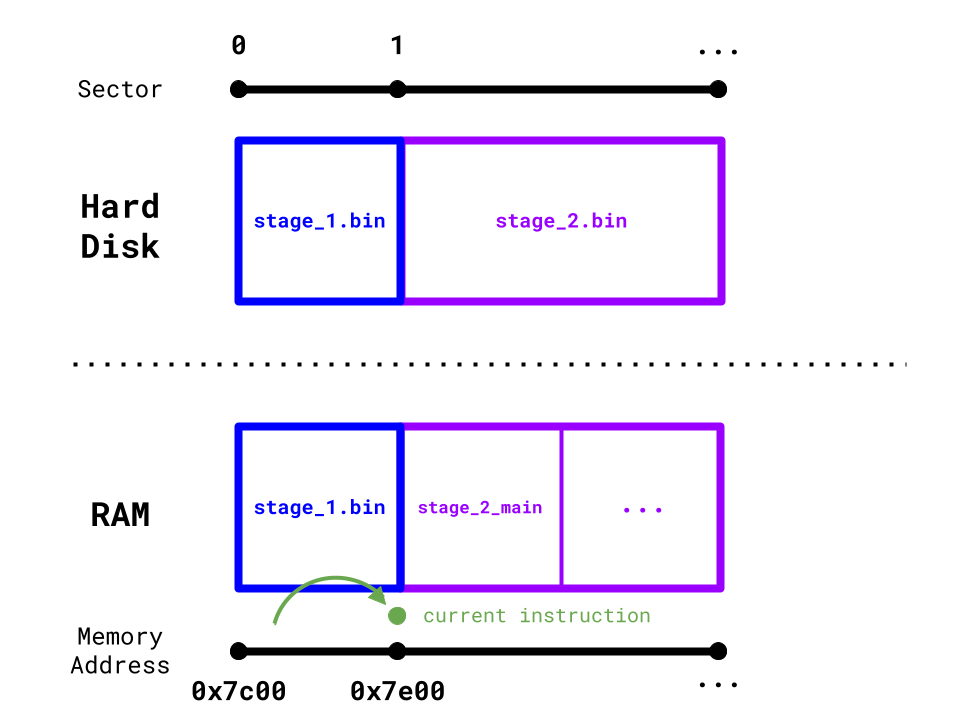
So all we really need to do is add stage_1.bin to the currently empty disk_image.iso, and then directly append stage_2.bin. This will give us the desired disk_image.iso structure. You can use the dd command to accomplish this if you use a Makefile or shell script.
In Rust:
// create a handle to `stage_1.bin`
let mut stage_1_bin = std::fs::File::open("<path to your stage_1.bin>/stage_1.bin")?;

// create a handle to `stage_2.bin`
let mut stage_2_bin = std::fs::File::open("<path to your stage_2.bin>/stage_2.bin")?;

// append `stage_1.bin` to `disk_image.iso`
std::io::copy(&mut stage_1_bin, &mut disk_image_iso)?;

// append `stage_2.bin` to `disk_image.iso`
std::io::copy(&mut stage_2_bin, &mut disk_image_iso)?;
Let's run our newly created disk_image.iso on QEMU:
qemu-system-x86_64 -drive format=raw,file=<path to your disk image>/disk_image.iso
You will see one of two results:
- If you didn't create a
commonlibrary crate to store shared functions (not my recommendation), you should have successfully seenHello from stage 2!
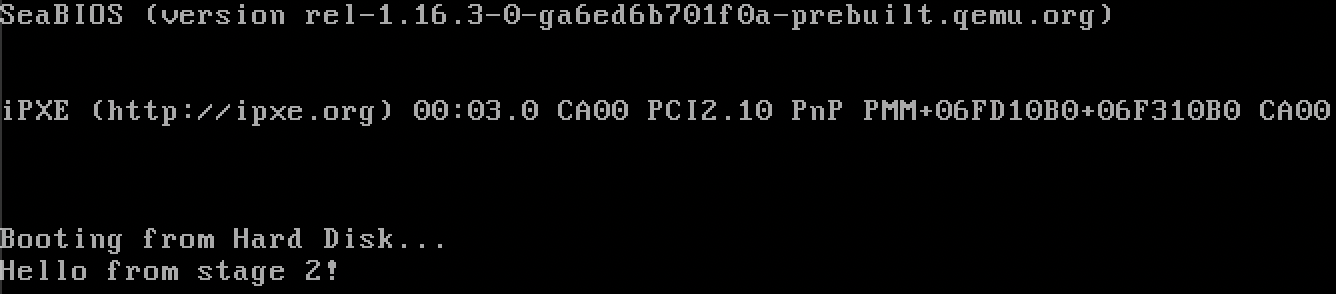
- However, there can be complications if you did create one (which is my recommendation since you get to not wastefully duplicate your code) and see this:
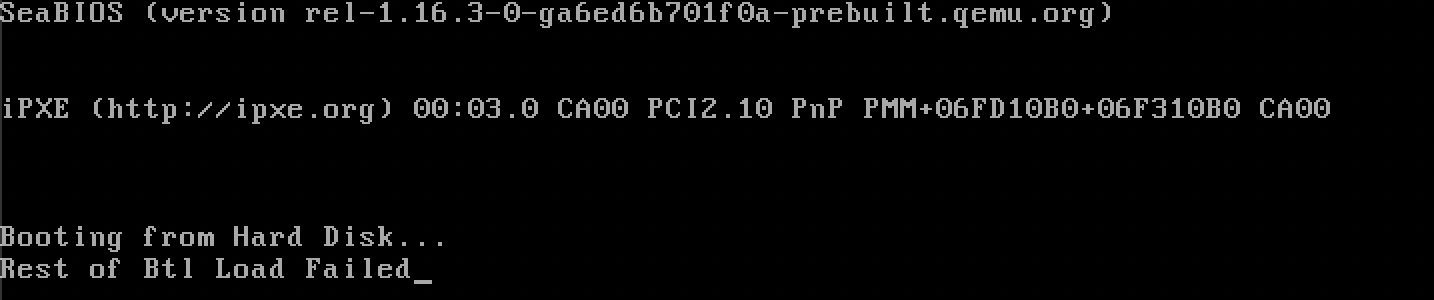
🆘 What do I do if I created a
commonlibrary crate? Is it over?No, but the issue is pretty hard to spot: the process of linking the library crate with our bootloader projects necessitated the linker to generate new link sections that we haven't mapped yet.
We talk about link sections here in case you want a refresher.
In our case,
stage_1additionally generates the.rodatalink section. If a link section is left unmapped, the linker is free to place it wherever. In this case, the.rodatasection gets placed before.text, and we can verify this by reusing thereadelftool:
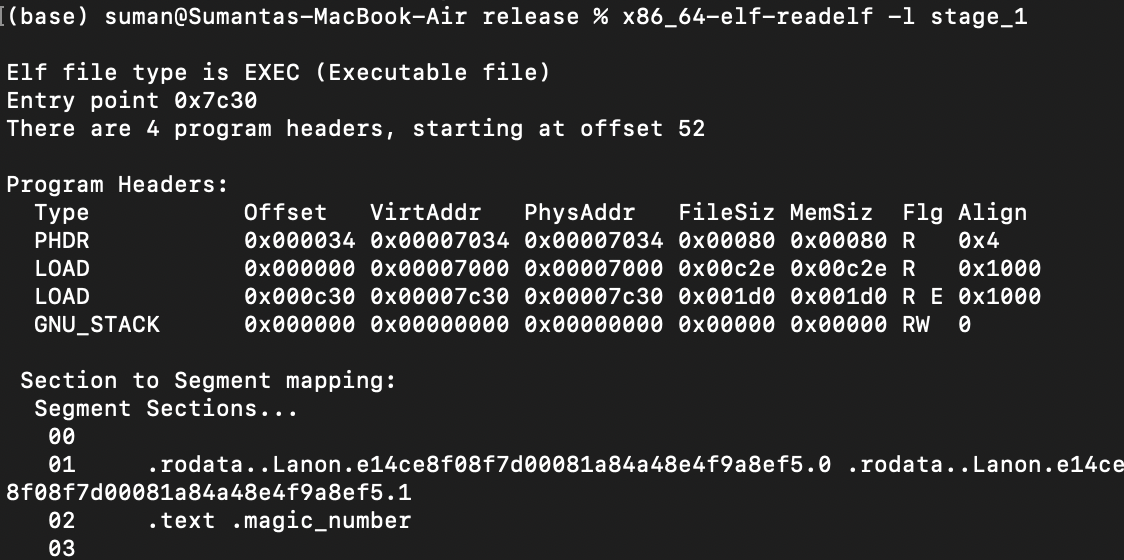
Notice how it lists
.rodatagenerated subsections before the.textsection. Also notice how the entry point is now at0x7c30and not0x7c00, being displaced by.rodata. This means when the CPU starts execution at0x7c00, it reinterprets memory in.rodataas computer instructions: all bets are off on what the machine does at this point.We can mitigate this by mapping the generated
.rodatasections/subsections to be after.textin the linker script:SECTIONS { . = 0x7c00; .text : { *(.text.entry) *(.text .text.*) } .rodata : { *(.rodata .rodata.*) } ... }Let's rerun
readelfto confirm that.textis correctly placed at the start of the binary:
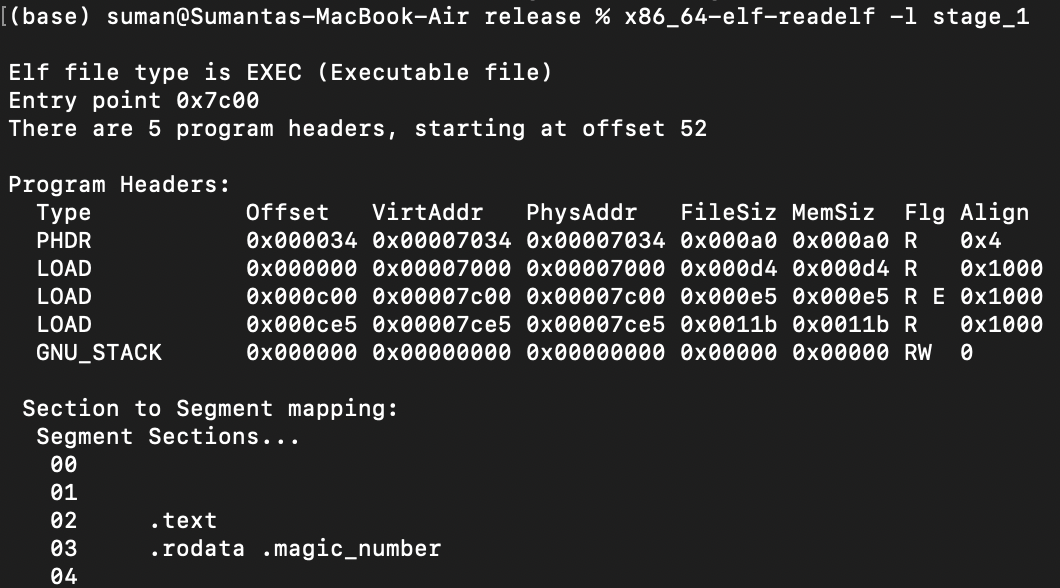
Perfect!
Unfortunately, new
.rodatalink subsection generation also happened withstage_2(since it also uses the library crate), so repeat the mapping process withstage_2to ensure that the new.rodatais placed after.text.Now with all link sections correctly ordered, let's rerun our program:
We ballin.
Our stage 1 bootloader is complete 😊! In other words, we have escaped the constricting 512-byte memory restriction and can now do so much more.
We'll begin writing our stage 2 bootloader in the next chapter.
TODO: have to set ds to 0 during dap creation
TODO: talk about string length and executable size
TODO: link section fix not just based on library crate. talk about potential .got and other sections (check for 512 even if shows after .magic_number)
TODO: Split into 2 sections